> ## Documentation Index
> Fetch the complete documentation index at: https://docs.agents.kolena.com/llms.txt
> Use this file to discover all available pages before exploring further.
# Excel Templates
> Creating templated Agent outputs using Excel Output Templates
Excel Output Templates allow you to design templated outputs for your Agents using Excel formulas to reference your Agent outputs. A special worksheet is inserted into your Excel workbook containing Agent outputs as **named ranges** and **structured references**, which you can then reference using Excel formulas throughout your workbook. This style of template supports both single-run templates and multiple-run templates.
If you use Excel on desktop for either PC or Mac, Kolena provides an Add-in
for editing your templates within Excel: [Kolena AI Agents for
Excel](#kolena-ai-agents-for-excel)
## The Agent Worksheet
Excel Output Templates contain a special Agent Worksheet titled "Kolena Agent" that contains Agent outputs as Excel **named ranges** and **structured references**. Each Prompt in your Agent has an associated template placeholder, which can be used to refer to the corresponding output in the Agent Worksheet.
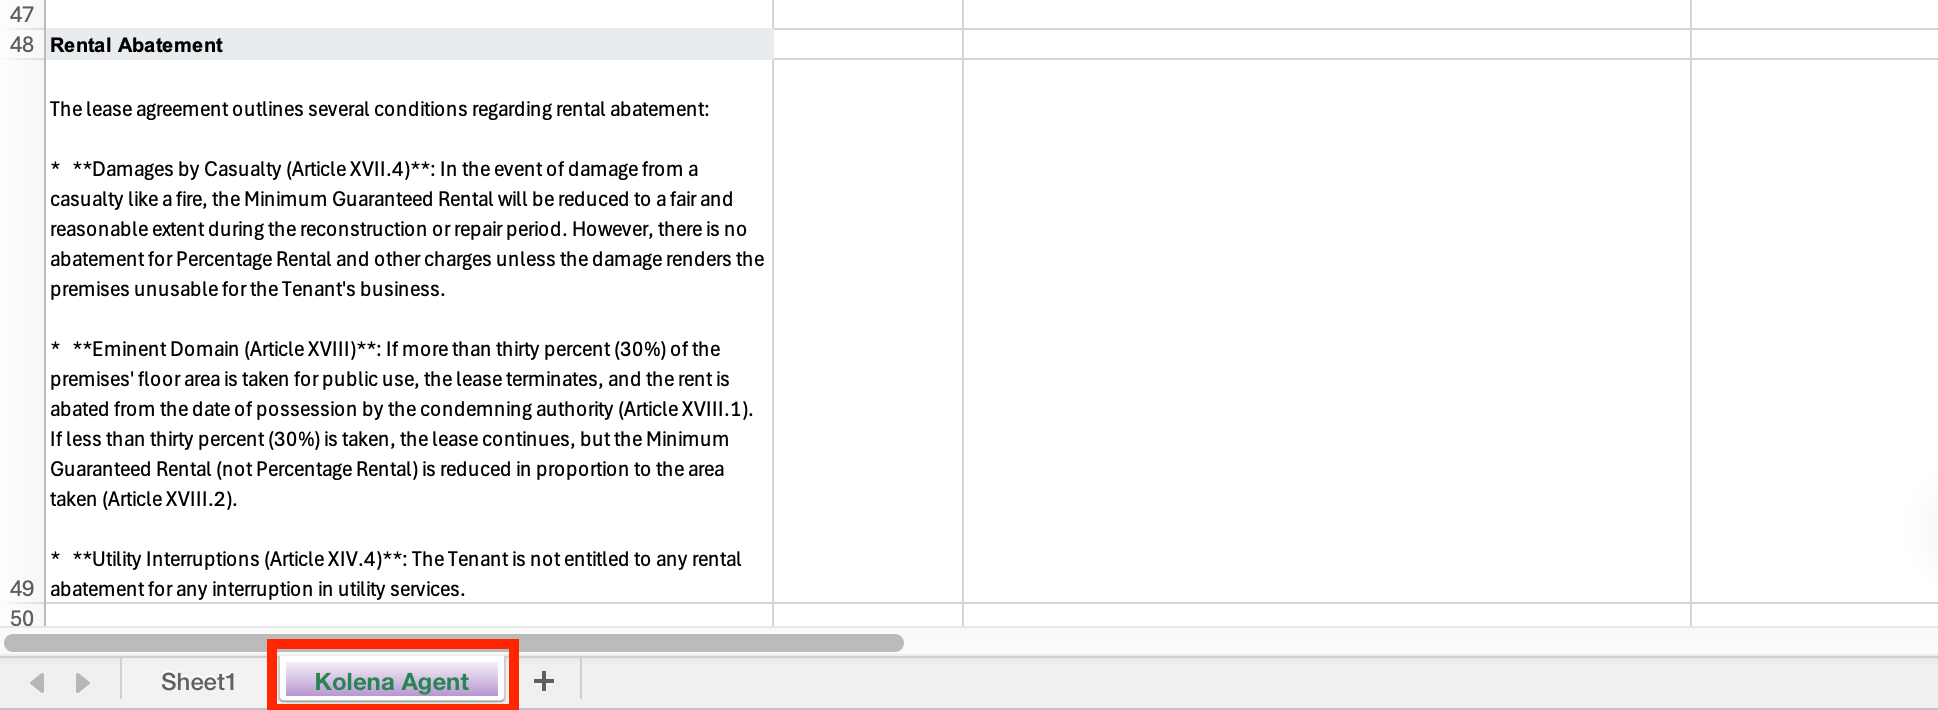 When you download a template for the first time, this worksheet may be hidden.
If you cannot see the Agent Worksheet after [setting up your
template](#working-with-excel-templates), follow the instructions here to
unhide the worksheet: [Hide or Unhide
worksheets](https://support.microsoft.com/en-us/office/hide-or-unhide-worksheets-69f2701a-21f5-4186-87d7-341a8cf53344).
To inspect the outputs available in the Agent Worksheet, you can inspect it directly, and you can also review the list of placeholders using Excel's [Name Manager](https://support.microsoft.com/en-us/office/use-the-name-manager-in-excel-4d8c4c2b-9f7d-44e3-a3b4-9f61bd5c64e4).
The data in the Agent Worksheet is structured differently depending on whether the template is for a single Run, or multiple Runs.
A single Excel cell can hold a maximum of 32,767 characters. An Agent output would be truncated if it exceeds this limit.
## Single-Run Templates
In Single-Run Excel Output Templates:
* Scalar outputs (Text, Number, True/False, Classification) are represented as named ranges
* Form and Table outputs are represented as **structured references**
### Single-Run Scalar Outputs
For simple Text, Number, True/False, or Classification Prompts, use the Prompt's template placeholder directly:
```
=placeholder_name
```
Example: If you have a Prompt named "Customer Name" with the placeholder `customer_name`, use:
```
=customer_name
```
### Single-Run Form Outputs
For form Prompts (key-value pairs), reference specific fields using bracket notation:
```
=placeholder_name[field_name]
```
Example: If you have a form prompt with template placeholder `customer_info` containing fields "Email" and "Phone":
```
=customer_info[Email]
=customer_info[Phone]
```
### Single-Run Table Outputs
For Table Prompts, you can reference:
* **The entire table**: `=placeholder_name`
* **A specific column**: `=placeholder_name[column_name]`
Example: If you have a Table Prompt with template placeholder `transactions` containing columns "Date" and "Amount":
```
=transactions (references the entire table)
=transactions[Date] (references the Date column)
=transactions[Amount] (references the Amount column)
```
Since these are Excel **structured references**, you can also use them anywhere Excel supports structured references (for example in `SUM`, `FILTER`, or `INDEX` formulas).
### Single-Run Reasoning and Citations
Reasoning and citations are stored in structured references:
* Reasoning can be found in the `kolena_reasoning` table
* Citations can be found in the `kolena_citations` table
Both tables have columns named after the Agent's Prompt template placeholders.
Example: If you have a Prompt named "Property Address" with placeholder `property_address`, you can reference the reasoning for this Prompt's output with:
```
=kolena_reasoning[property_address]
```
You can access the citations with:
```
=kolena_citations[property_address]
```
## Multiple-Run Templates
In Multiple-Run Templates, all outputs are stored in **structured references**. Each Prompt has a corresponding table, and each table row has a "Run ID" column that indicates the Run associated with that row.
### Multiple-Run Scalar Outputs
Rows from scalar outputs (Text, Number, True/False, Classification) have a "Value" column that contains the output value for the Run associated with that row:
* Each Run will have a single row in the table.
* Each row has a **Value** column with the value for that row
* Each row has also has a **Reasoning** column containing reasoning, and a **Citations** containing citations
Example: If you have a Prompt named "Customer Age" with template placeholder "customer\_age", you will have an Excel table named `customer_age` with the following structure:
| Run ID | Value | Reasoning | Citations |
| ------ | ----- | --------- | --------- |
| 1 | 25 | ... | ... |
| 2 | 77 | ... | ... |
| 3 | 45 | ... | ... |
| ... | ... | ... | ... |
To get the list of customer ages, use this formula:
```
=custom_age[Value]
```
To get average customer age across runs, you could use a formula like:
```
=AVERAGE(NUMBERVALUE(customer_age[Value]))
```
Table cells are always formatted as text, so you may need to convert to
numbers using functions such as `NUMBERVALUE` before performing calculations.
### Multiple-Run Form Outputs
Rows from form outputs have columns corresponding to the Prompt's fields:
* Each Run will have a single row in the table
* Each row has a column for each Prompt field
* Each row has also has a **Reasoning** column containing reasoning, and a **Citations** containing citations
Example: If you have a form Prompt named "Tax Rate" with template placeholder "tax\_rate", and three columns "North America", "Europe", and "Asia", you will have an Excel table with the following structure:
| Run ID | North America | Europe | Asia | Reasoning | Citations |
| ------ | ------------- | ------ | ---- | --------- | --------- |
| 1 | 0.25 | 0.20 | 0.15 | ... | ... |
| 2 | 0.26 | 0.21 | 0.16 | ... | ... |
| 3 | 0.24 | 0.19 | 0.14 | ... | ... |
| ... | ... | ... | ... | ... | ... |
To get the list of European tax rates, use the formula:
```
=tax_rate[Europe]
```
To get the mininum Asian tax rate, use a formula like:
```
=MIN(NUMBERVALUE(tax_rate[Asia]))
```
### Multiple-Run Table Outputs
Rows from table outputs have columns corresponding to the Prompt's columns:
* Each Run can have multiple rows in the table (one row for each row in the table output)
* Each row has a column for each Prompt column
* Each row has a **Run ID** column that indicates the Run associated with that row
* Each row also has a **Reasoning** column containing reasoning, and a **Citations** column containing citations. Only the first row for each Run ID will have these columns populated.
Example: If you have a Table Prompt named "Transactions" with template placeholder `transactions`, and columns "Date", "Amount", and "Description", you will have an Excel table named `transactions` with the following structure:
| Run ID | Date | Amount | Description | Reasoning | Citations |
| ------ | ---------- | ------ | ----------- | --------- | --------- |
| 1 | 2024-01-15 | 100.00 | Purchase | ... | ... |
| 1 | 2024-01-16 | 250.50 | Payment | *(empty)* | *(empty)* |
| 2 | 2024-02-01 | 75.25 | Refund | ... | ... |
| 2 | 2024-02-05 | 300.00 | Purchase | *(empty)* | *(empty)* |
| 2 | 2024-02-10 | 50.00 | Fee | *(empty)* | *(empty)* |
| ... | ... | ... | ... | ... | ... |
To get all transactions from Run 1, you could use a formula like:
```
=FILTER(transactions, transactions[Run ID] = 1)
```
To get the sum of all amounts across all runs, use:
```
=SUM(NUMBERVALUE(transactions[Amount]))
```
### Multiple-Run Files
Multiple-run templates have an additional table named `kolena_runs` that keeps track of the input files associated with each run. It has two columns:
* **Run ID**: The Run ID for the row (the same ID used in other Prompt output tables)
* **Files**: A list of the filenames of the input files associated with the run, separated by commas.
An example table would look like:
| Run ID | Files |
| ------ | ------------------------------------ |
| 1 | document1.pdf, invoice\_2024\_01.pdf |
| 2 | contract\_abc.docx |
| 3 | report.xlsx, data.csv, summary.pdf |
| ... | ... |
***
## Kolena AI Agents for Excel
The **Kolena AI Agents for Excel** add-in lets you create and edit [Excel Output Templates](/templated-outputs/excel-templates) directly in Microsoft Excel. You can turn any workbook into an Output Template, reference Agent outputs with Excel formulas, preview how the template behaves with different Agent runs, and save or load templates.
### Requirements
**Kolena AI Agents for Excel** is supported in the following versions of Excel:
* Excel on Windows (Microsoft 365)
* Excel 2019 or later on Mac
* Excel on Mac (Microsoft 365)
The add-in uses the same security model as the rest of the platform: the same
authentication, the same permission checks, and full audit logging for every
action.
### Getting Started
#### Installing the Add-in
##### Sign into Office 365
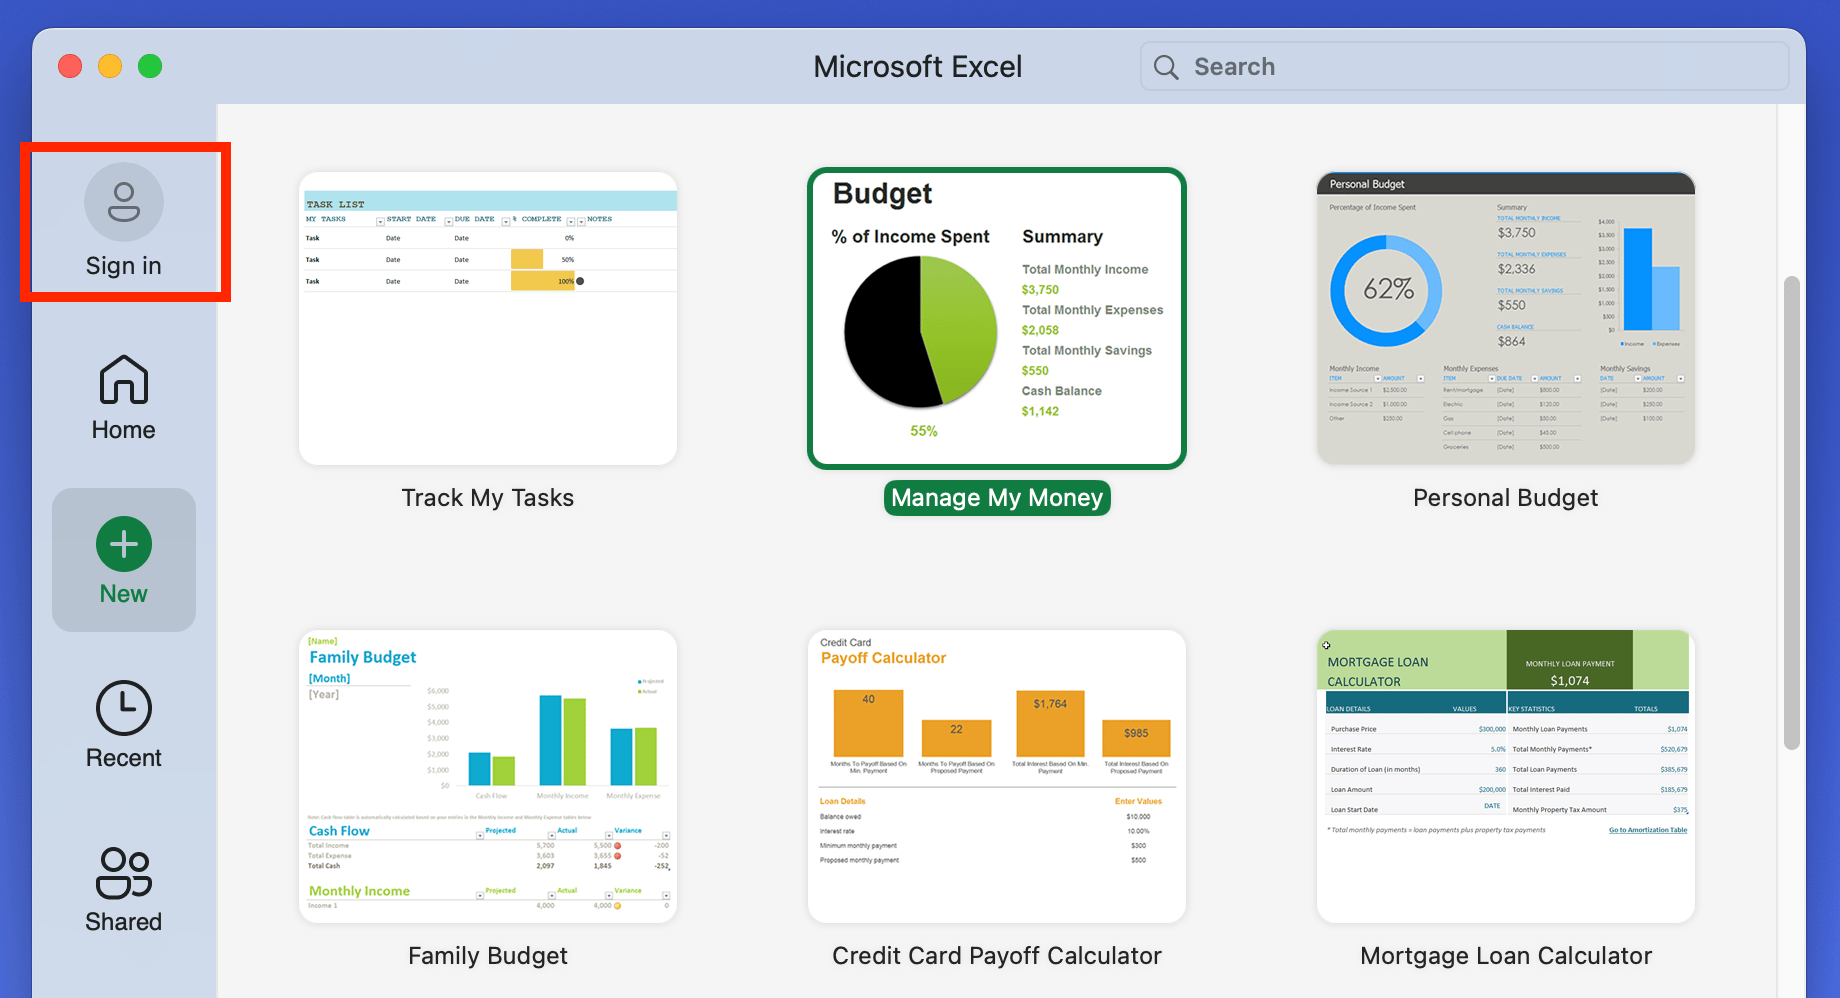
Before installing the add-in, make sure that you are signed-in to Excel:
* Open Excel, and open **File** > **New From Template**
* If you see a "Sign In" button in the upper-righthand corner, click this and follow the sign in process. If you see your username there already, you are already signed-in.
When you download a template for the first time, this worksheet may be hidden.
If you cannot see the Agent Worksheet after [setting up your
template](#working-with-excel-templates), follow the instructions here to
unhide the worksheet: [Hide or Unhide
worksheets](https://support.microsoft.com/en-us/office/hide-or-unhide-worksheets-69f2701a-21f5-4186-87d7-341a8cf53344).
To inspect the outputs available in the Agent Worksheet, you can inspect it directly, and you can also review the list of placeholders using Excel's [Name Manager](https://support.microsoft.com/en-us/office/use-the-name-manager-in-excel-4d8c4c2b-9f7d-44e3-a3b4-9f61bd5c64e4).
The data in the Agent Worksheet is structured differently depending on whether the template is for a single Run, or multiple Runs.
A single Excel cell can hold a maximum of 32,767 characters. An Agent output would be truncated if it exceeds this limit.
## Single-Run Templates
In Single-Run Excel Output Templates:
* Scalar outputs (Text, Number, True/False, Classification) are represented as named ranges
* Form and Table outputs are represented as **structured references**
### Single-Run Scalar Outputs
For simple Text, Number, True/False, or Classification Prompts, use the Prompt's template placeholder directly:
```
=placeholder_name
```
Example: If you have a Prompt named "Customer Name" with the placeholder `customer_name`, use:
```
=customer_name
```
### Single-Run Form Outputs
For form Prompts (key-value pairs), reference specific fields using bracket notation:
```
=placeholder_name[field_name]
```
Example: If you have a form prompt with template placeholder `customer_info` containing fields "Email" and "Phone":
```
=customer_info[Email]
=customer_info[Phone]
```
### Single-Run Table Outputs
For Table Prompts, you can reference:
* **The entire table**: `=placeholder_name`
* **A specific column**: `=placeholder_name[column_name]`
Example: If you have a Table Prompt with template placeholder `transactions` containing columns "Date" and "Amount":
```
=transactions (references the entire table)
=transactions[Date] (references the Date column)
=transactions[Amount] (references the Amount column)
```
Since these are Excel **structured references**, you can also use them anywhere Excel supports structured references (for example in `SUM`, `FILTER`, or `INDEX` formulas).
### Single-Run Reasoning and Citations
Reasoning and citations are stored in structured references:
* Reasoning can be found in the `kolena_reasoning` table
* Citations can be found in the `kolena_citations` table
Both tables have columns named after the Agent's Prompt template placeholders.
Example: If you have a Prompt named "Property Address" with placeholder `property_address`, you can reference the reasoning for this Prompt's output with:
```
=kolena_reasoning[property_address]
```
You can access the citations with:
```
=kolena_citations[property_address]
```
## Multiple-Run Templates
In Multiple-Run Templates, all outputs are stored in **structured references**. Each Prompt has a corresponding table, and each table row has a "Run ID" column that indicates the Run associated with that row.
### Multiple-Run Scalar Outputs
Rows from scalar outputs (Text, Number, True/False, Classification) have a "Value" column that contains the output value for the Run associated with that row:
* Each Run will have a single row in the table.
* Each row has a **Value** column with the value for that row
* Each row has also has a **Reasoning** column containing reasoning, and a **Citations** containing citations
Example: If you have a Prompt named "Customer Age" with template placeholder "customer\_age", you will have an Excel table named `customer_age` with the following structure:
| Run ID | Value | Reasoning | Citations |
| ------ | ----- | --------- | --------- |
| 1 | 25 | ... | ... |
| 2 | 77 | ... | ... |
| 3 | 45 | ... | ... |
| ... | ... | ... | ... |
To get the list of customer ages, use this formula:
```
=custom_age[Value]
```
To get average customer age across runs, you could use a formula like:
```
=AVERAGE(NUMBERVALUE(customer_age[Value]))
```
Table cells are always formatted as text, so you may need to convert to
numbers using functions such as `NUMBERVALUE` before performing calculations.
### Multiple-Run Form Outputs
Rows from form outputs have columns corresponding to the Prompt's fields:
* Each Run will have a single row in the table
* Each row has a column for each Prompt field
* Each row has also has a **Reasoning** column containing reasoning, and a **Citations** containing citations
Example: If you have a form Prompt named "Tax Rate" with template placeholder "tax\_rate", and three columns "North America", "Europe", and "Asia", you will have an Excel table with the following structure:
| Run ID | North America | Europe | Asia | Reasoning | Citations |
| ------ | ------------- | ------ | ---- | --------- | --------- |
| 1 | 0.25 | 0.20 | 0.15 | ... | ... |
| 2 | 0.26 | 0.21 | 0.16 | ... | ... |
| 3 | 0.24 | 0.19 | 0.14 | ... | ... |
| ... | ... | ... | ... | ... | ... |
To get the list of European tax rates, use the formula:
```
=tax_rate[Europe]
```
To get the mininum Asian tax rate, use a formula like:
```
=MIN(NUMBERVALUE(tax_rate[Asia]))
```
### Multiple-Run Table Outputs
Rows from table outputs have columns corresponding to the Prompt's columns:
* Each Run can have multiple rows in the table (one row for each row in the table output)
* Each row has a column for each Prompt column
* Each row has a **Run ID** column that indicates the Run associated with that row
* Each row also has a **Reasoning** column containing reasoning, and a **Citations** column containing citations. Only the first row for each Run ID will have these columns populated.
Example: If you have a Table Prompt named "Transactions" with template placeholder `transactions`, and columns "Date", "Amount", and "Description", you will have an Excel table named `transactions` with the following structure:
| Run ID | Date | Amount | Description | Reasoning | Citations |
| ------ | ---------- | ------ | ----------- | --------- | --------- |
| 1 | 2024-01-15 | 100.00 | Purchase | ... | ... |
| 1 | 2024-01-16 | 250.50 | Payment | *(empty)* | *(empty)* |
| 2 | 2024-02-01 | 75.25 | Refund | ... | ... |
| 2 | 2024-02-05 | 300.00 | Purchase | *(empty)* | *(empty)* |
| 2 | 2024-02-10 | 50.00 | Fee | *(empty)* | *(empty)* |
| ... | ... | ... | ... | ... | ... |
To get all transactions from Run 1, you could use a formula like:
```
=FILTER(transactions, transactions[Run ID] = 1)
```
To get the sum of all amounts across all runs, use:
```
=SUM(NUMBERVALUE(transactions[Amount]))
```
### Multiple-Run Files
Multiple-run templates have an additional table named `kolena_runs` that keeps track of the input files associated with each run. It has two columns:
* **Run ID**: The Run ID for the row (the same ID used in other Prompt output tables)
* **Files**: A list of the filenames of the input files associated with the run, separated by commas.
An example table would look like:
| Run ID | Files |
| ------ | ------------------------------------ |
| 1 | document1.pdf, invoice\_2024\_01.pdf |
| 2 | contract\_abc.docx |
| 3 | report.xlsx, data.csv, summary.pdf |
| ... | ... |
***
## Kolena AI Agents for Excel
The **Kolena AI Agents for Excel** add-in lets you create and edit [Excel Output Templates](/templated-outputs/excel-templates) directly in Microsoft Excel. You can turn any workbook into an Output Template, reference Agent outputs with Excel formulas, preview how the template behaves with different Agent runs, and save or load templates.
### Requirements
**Kolena AI Agents for Excel** is supported in the following versions of Excel:
* Excel on Windows (Microsoft 365)
* Excel 2019 or later on Mac
* Excel on Mac (Microsoft 365)
The add-in uses the same security model as the rest of the platform: the same
authentication, the same permission checks, and full audit logging for every
action.
### Getting Started
#### Installing the Add-in
##### Sign into Office 365
Before installing the add-in, make sure that you are signed-in to Excel:
* Open Excel, and open **File** > **New From Template**
* If you see a "Sign In" button in the upper-righthand corner, click this and follow the sign in process. If you see your username there already, you are already signed-in.
 ##### Install from Excel
The simplest way to install the add-in is from within Excel, by searching the Microsoft Add-in Marketplace:
* In Excel, on the **Home** ribbon navigate to **Add-ins** > **More Add-ins**
* Search for "Kolena AI Agents for Excel" and install it
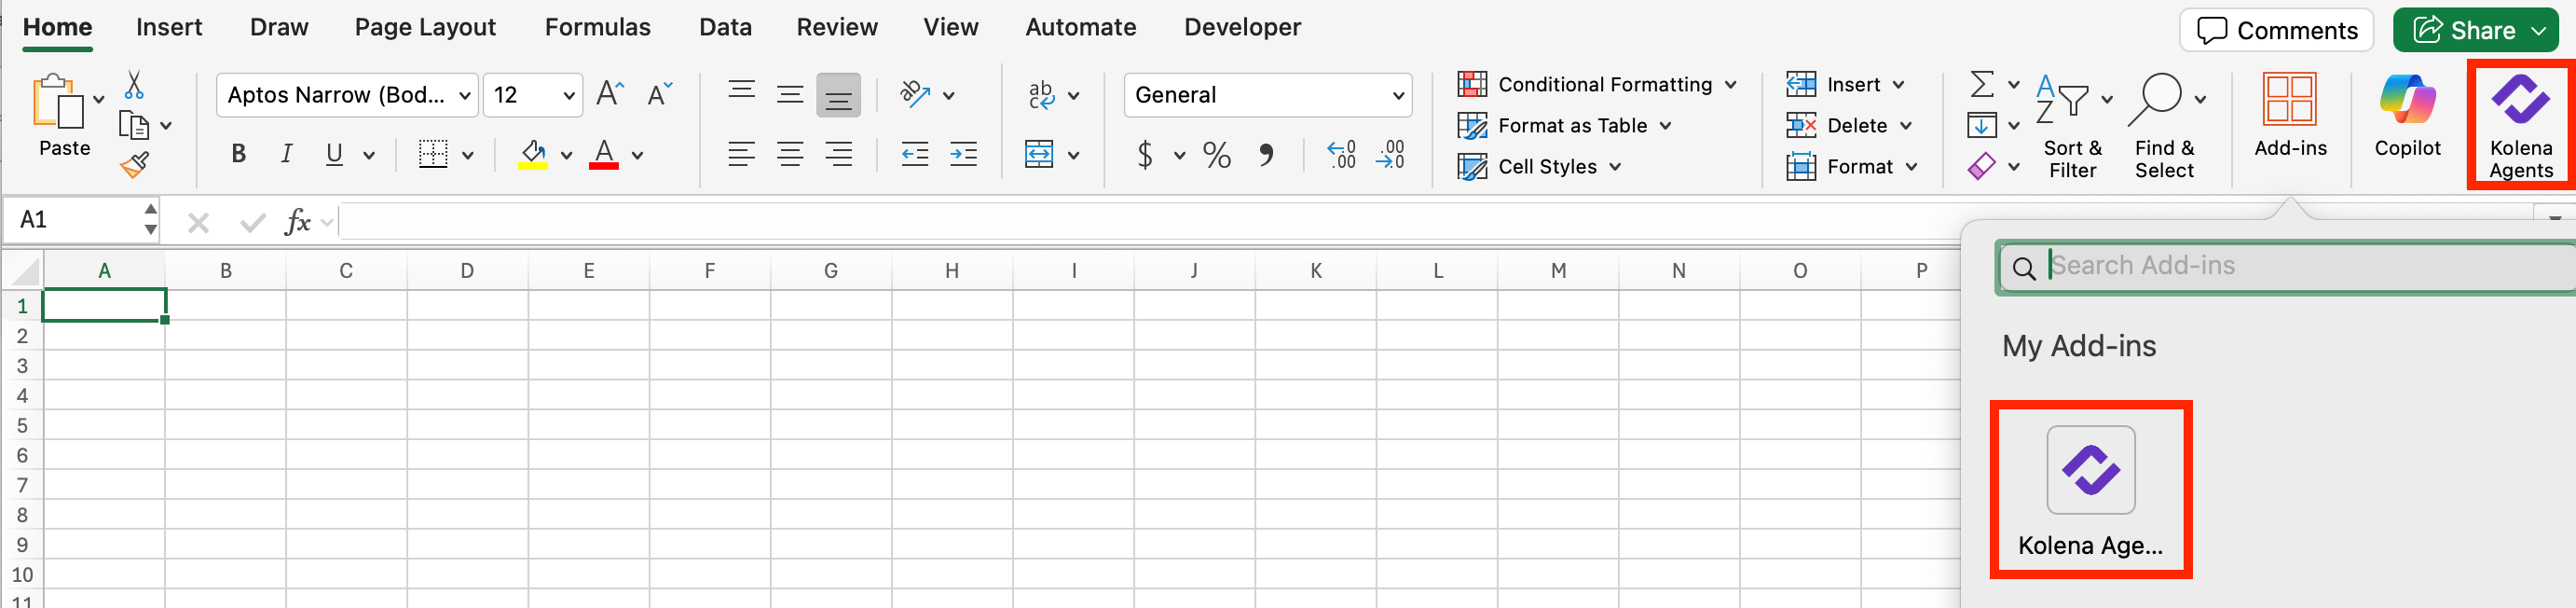
* After installing, the add-in should appear in your **Home** ribbon, or in the list of installed add-ins found by clicking **Home** > **Add-ins**
##### Install from Excel
The simplest way to install the add-in is from within Excel, by searching the Microsoft Add-in Marketplace:
* In Excel, on the **Home** ribbon navigate to **Add-ins** > **More Add-ins**
* Search for "Kolena AI Agents for Excel" and install it
* After installing, the add-in should appear in your **Home** ribbon, or in the list of installed add-ins found by clicking **Home** > **Add-ins**
 If the add-in does not appear after installing, [make sure you are signed
in](#sign-into-office-365) and try installing again.
##### Install from the Web
You can also install from the web by following this link to add the add-in to your Office 365 account: [Kolena AI Agents for Excel](https://marketplace.microsoft.com/en-us/product/office/WA200009745?tab=Overview)
* After installing the add-in to your Office 365 account, you should be taken to the app page for Kolena AI Agents for Excel. If not, you can access this page by visiting **Settings** (sidebar) > **Integrated apps** > **Kolena AI Agents for Excel**
If the add-in does not appear after installing, [make sure you are signed
in](#sign-into-office-365) and try installing again.
##### Install from the Web
You can also install from the web by following this link to add the add-in to your Office 365 account: [Kolena AI Agents for Excel](https://marketplace.microsoft.com/en-us/product/office/WA200009745?tab=Overview)
* After installing the add-in to your Office 365 account, you should be taken to the app page for Kolena AI Agents for Excel. If not, you can access this page by visiting **Settings** (sidebar) > **Integrated apps** > **Kolena AI Agents for Excel**
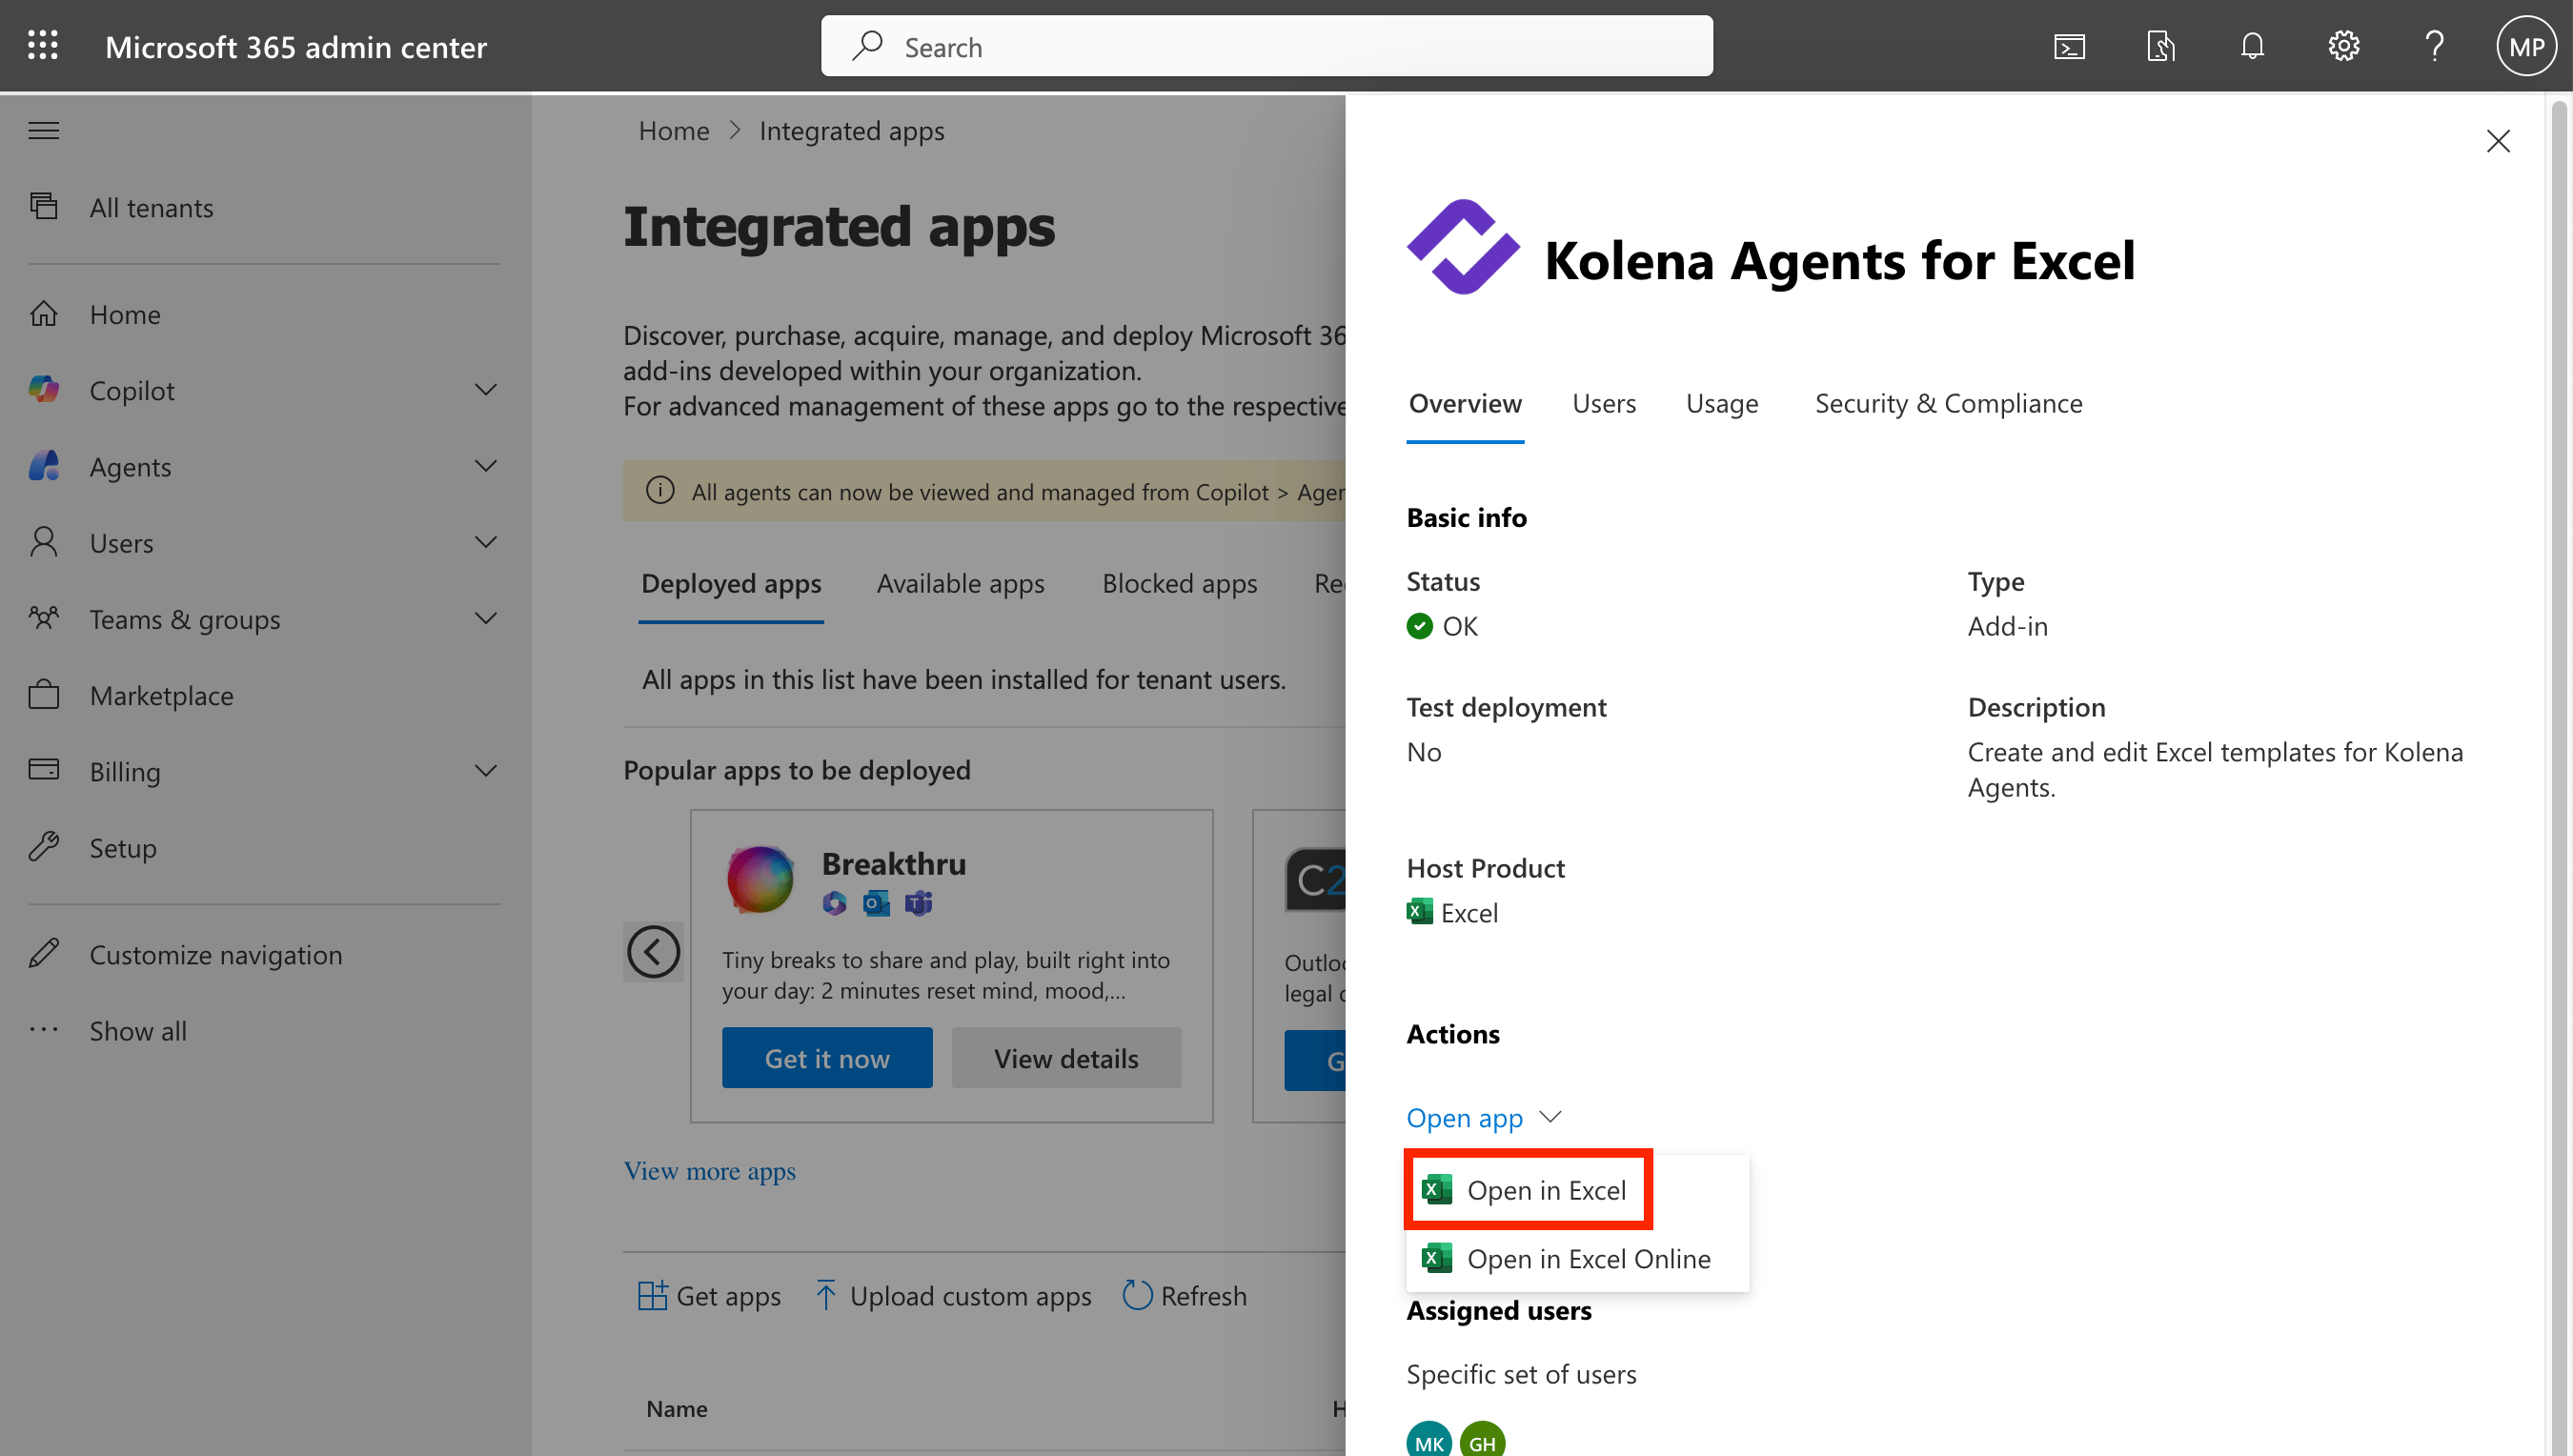
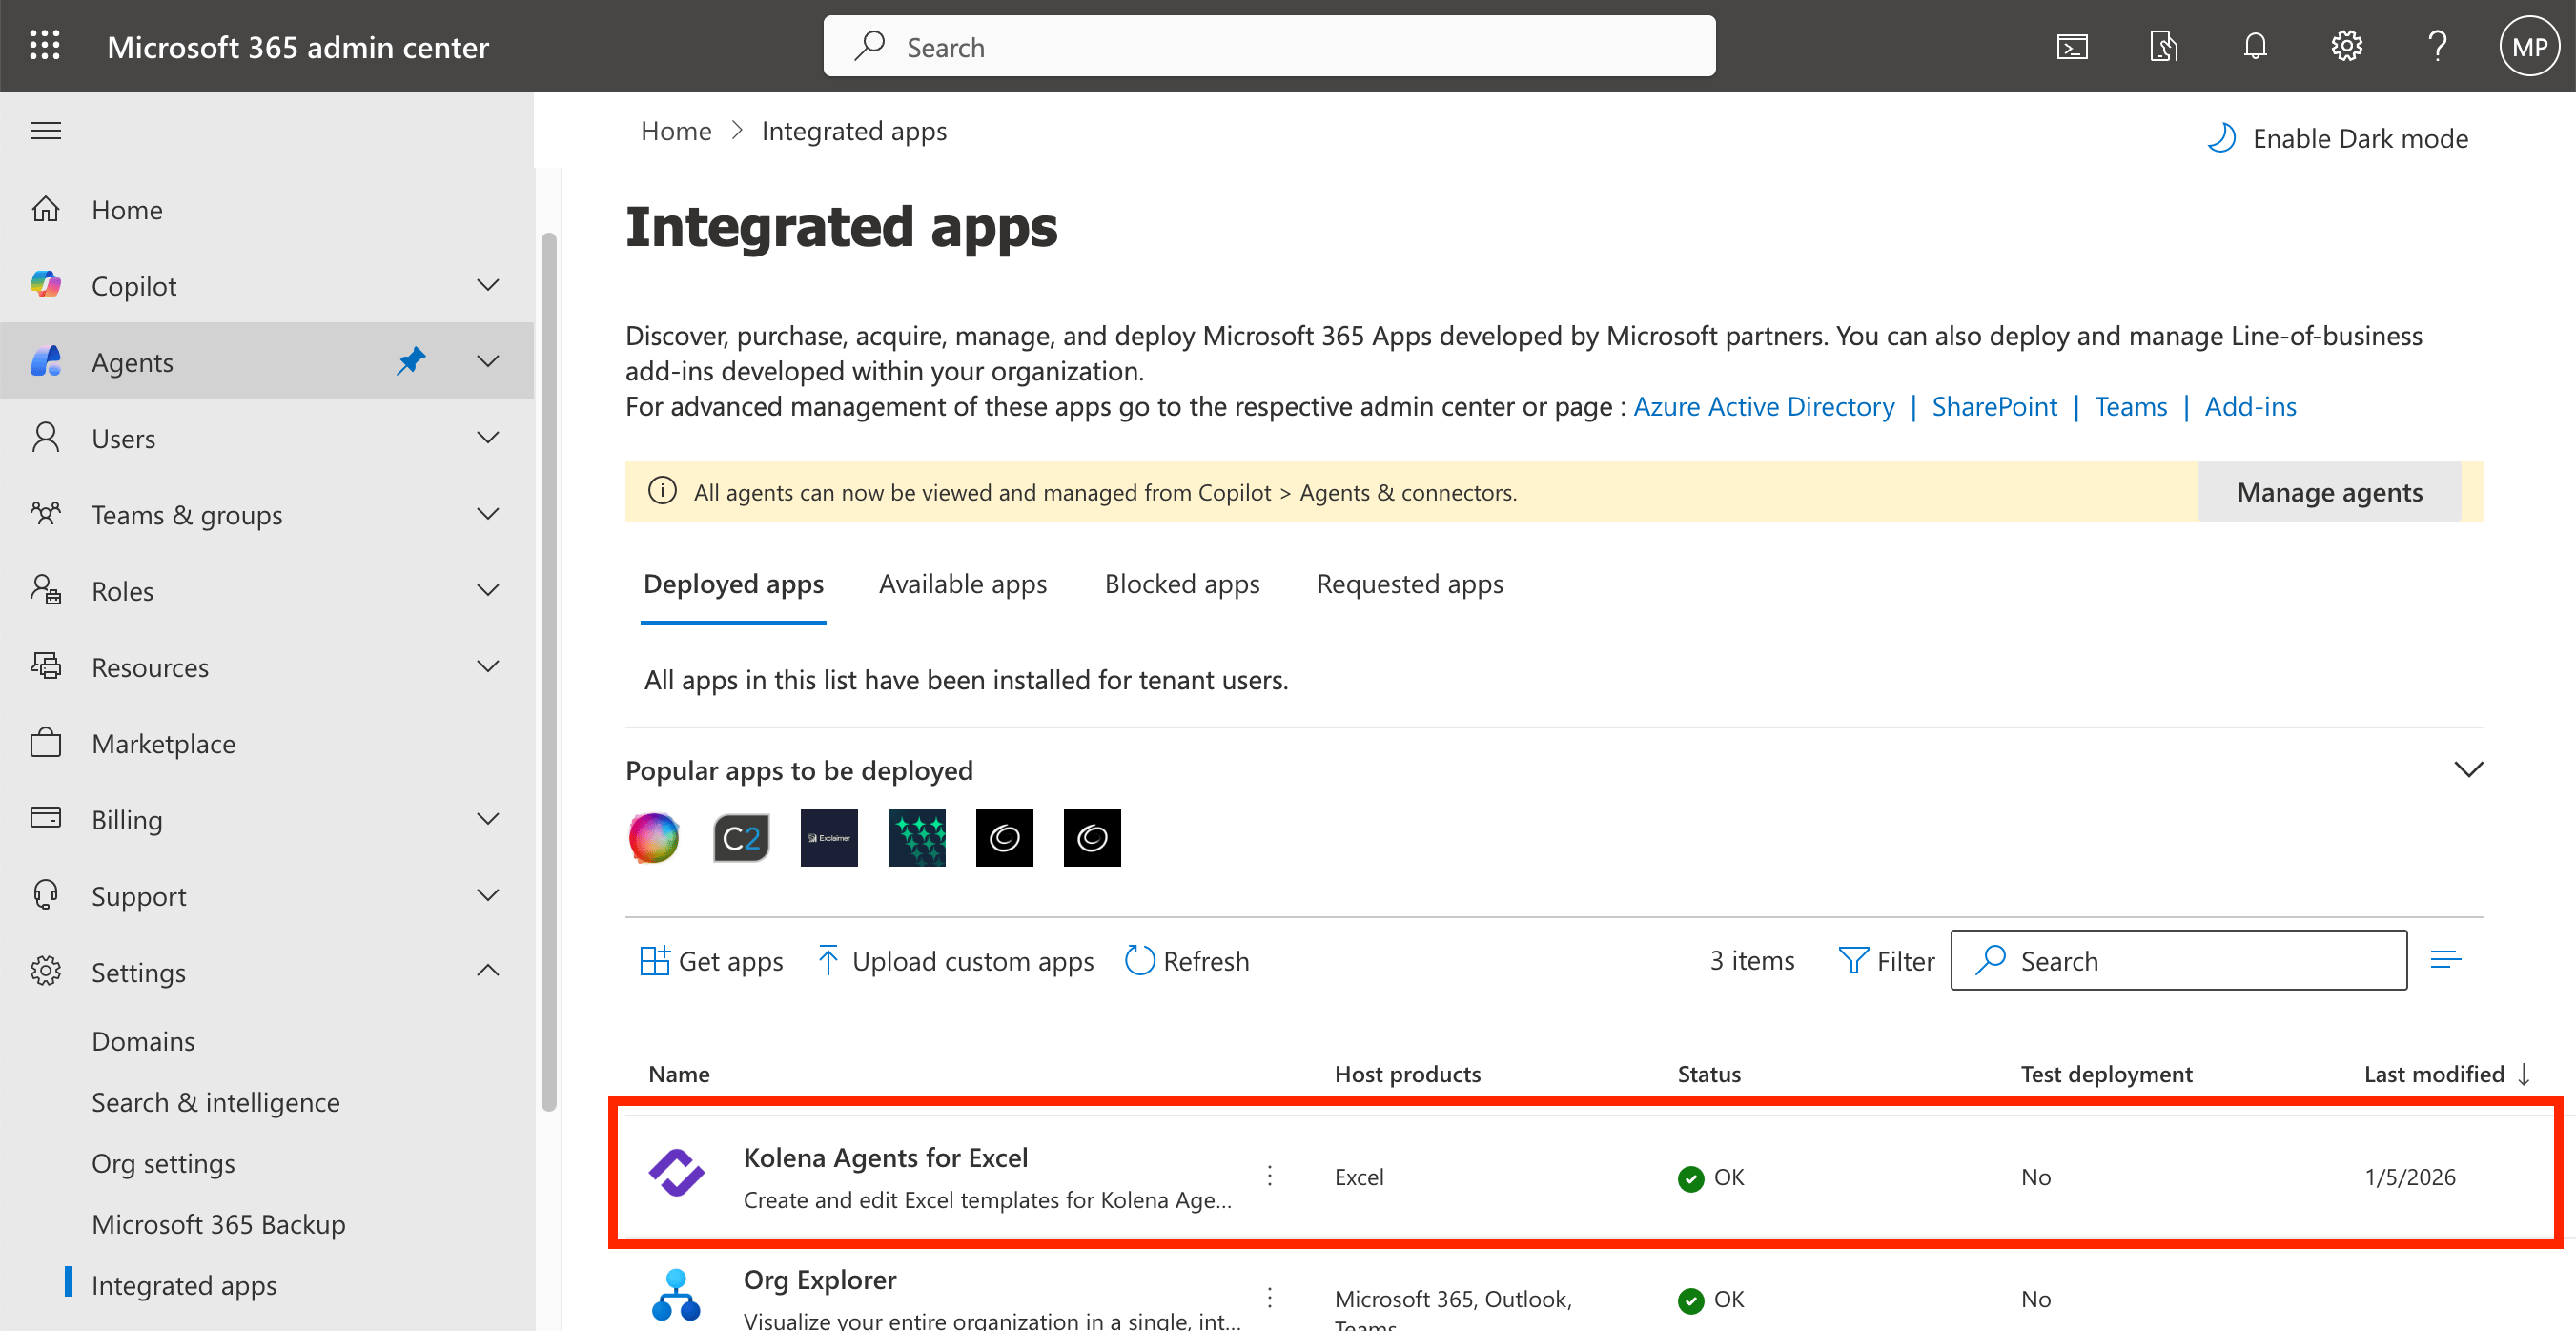 * Click the link from the Microsoft 365 Admin Center to open the add-in in Excel: **Actions** > **Open app** > **Open in Excel**
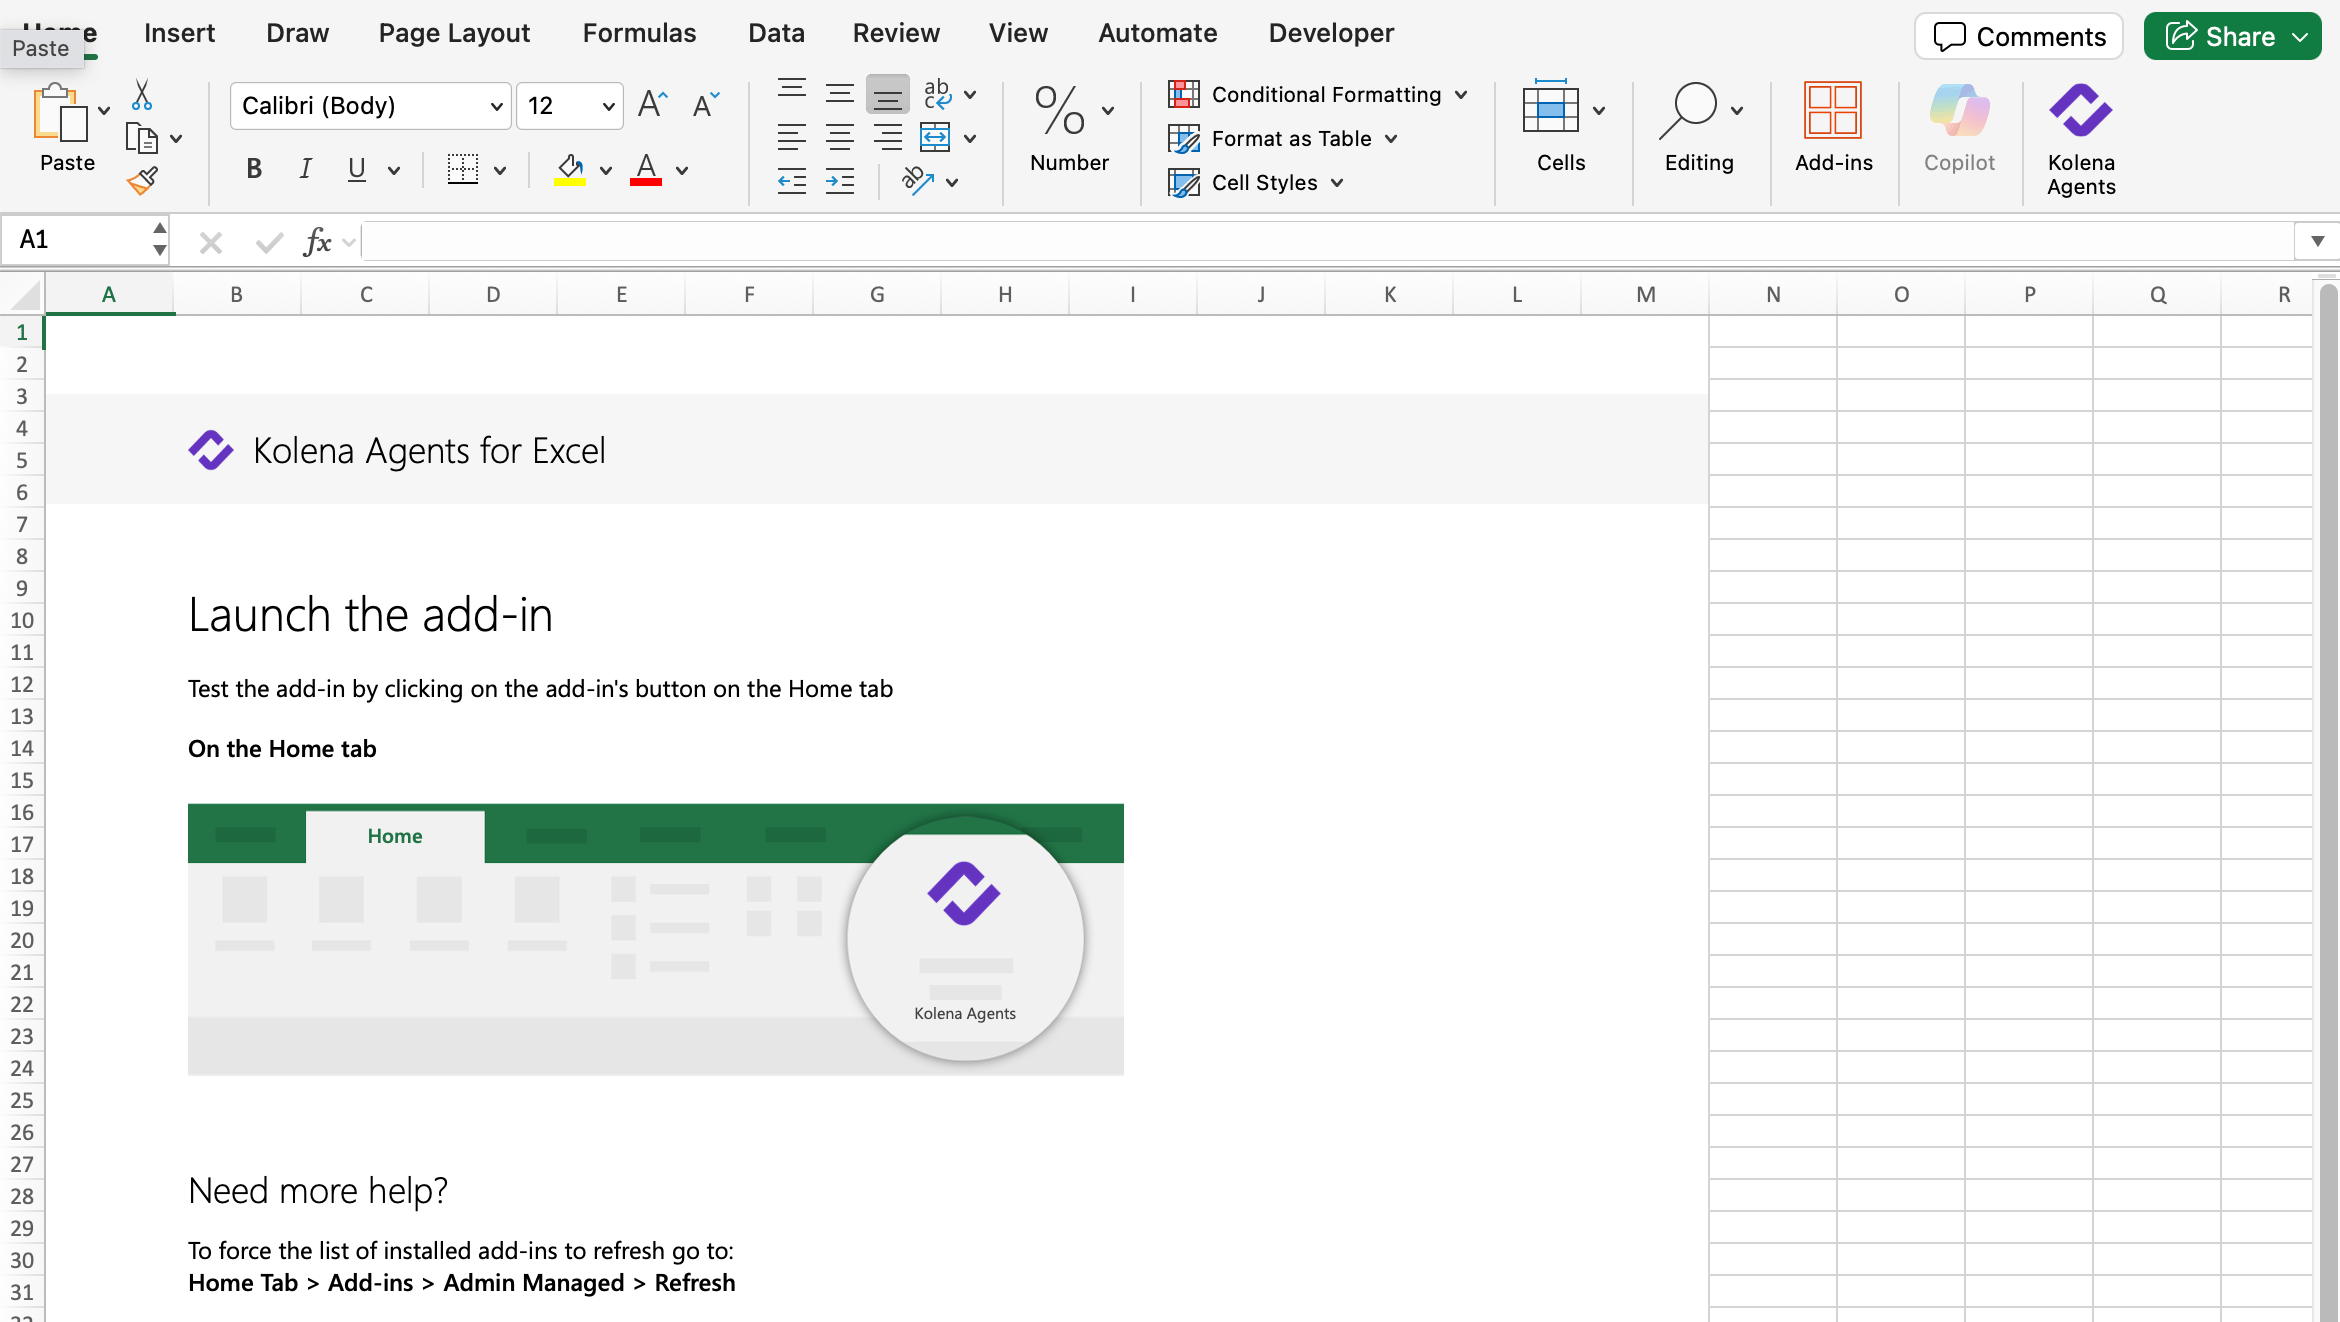
 * After installing, you should be presented with a worksheet prompting you to open the add-in:
 #### Opening the Add-in
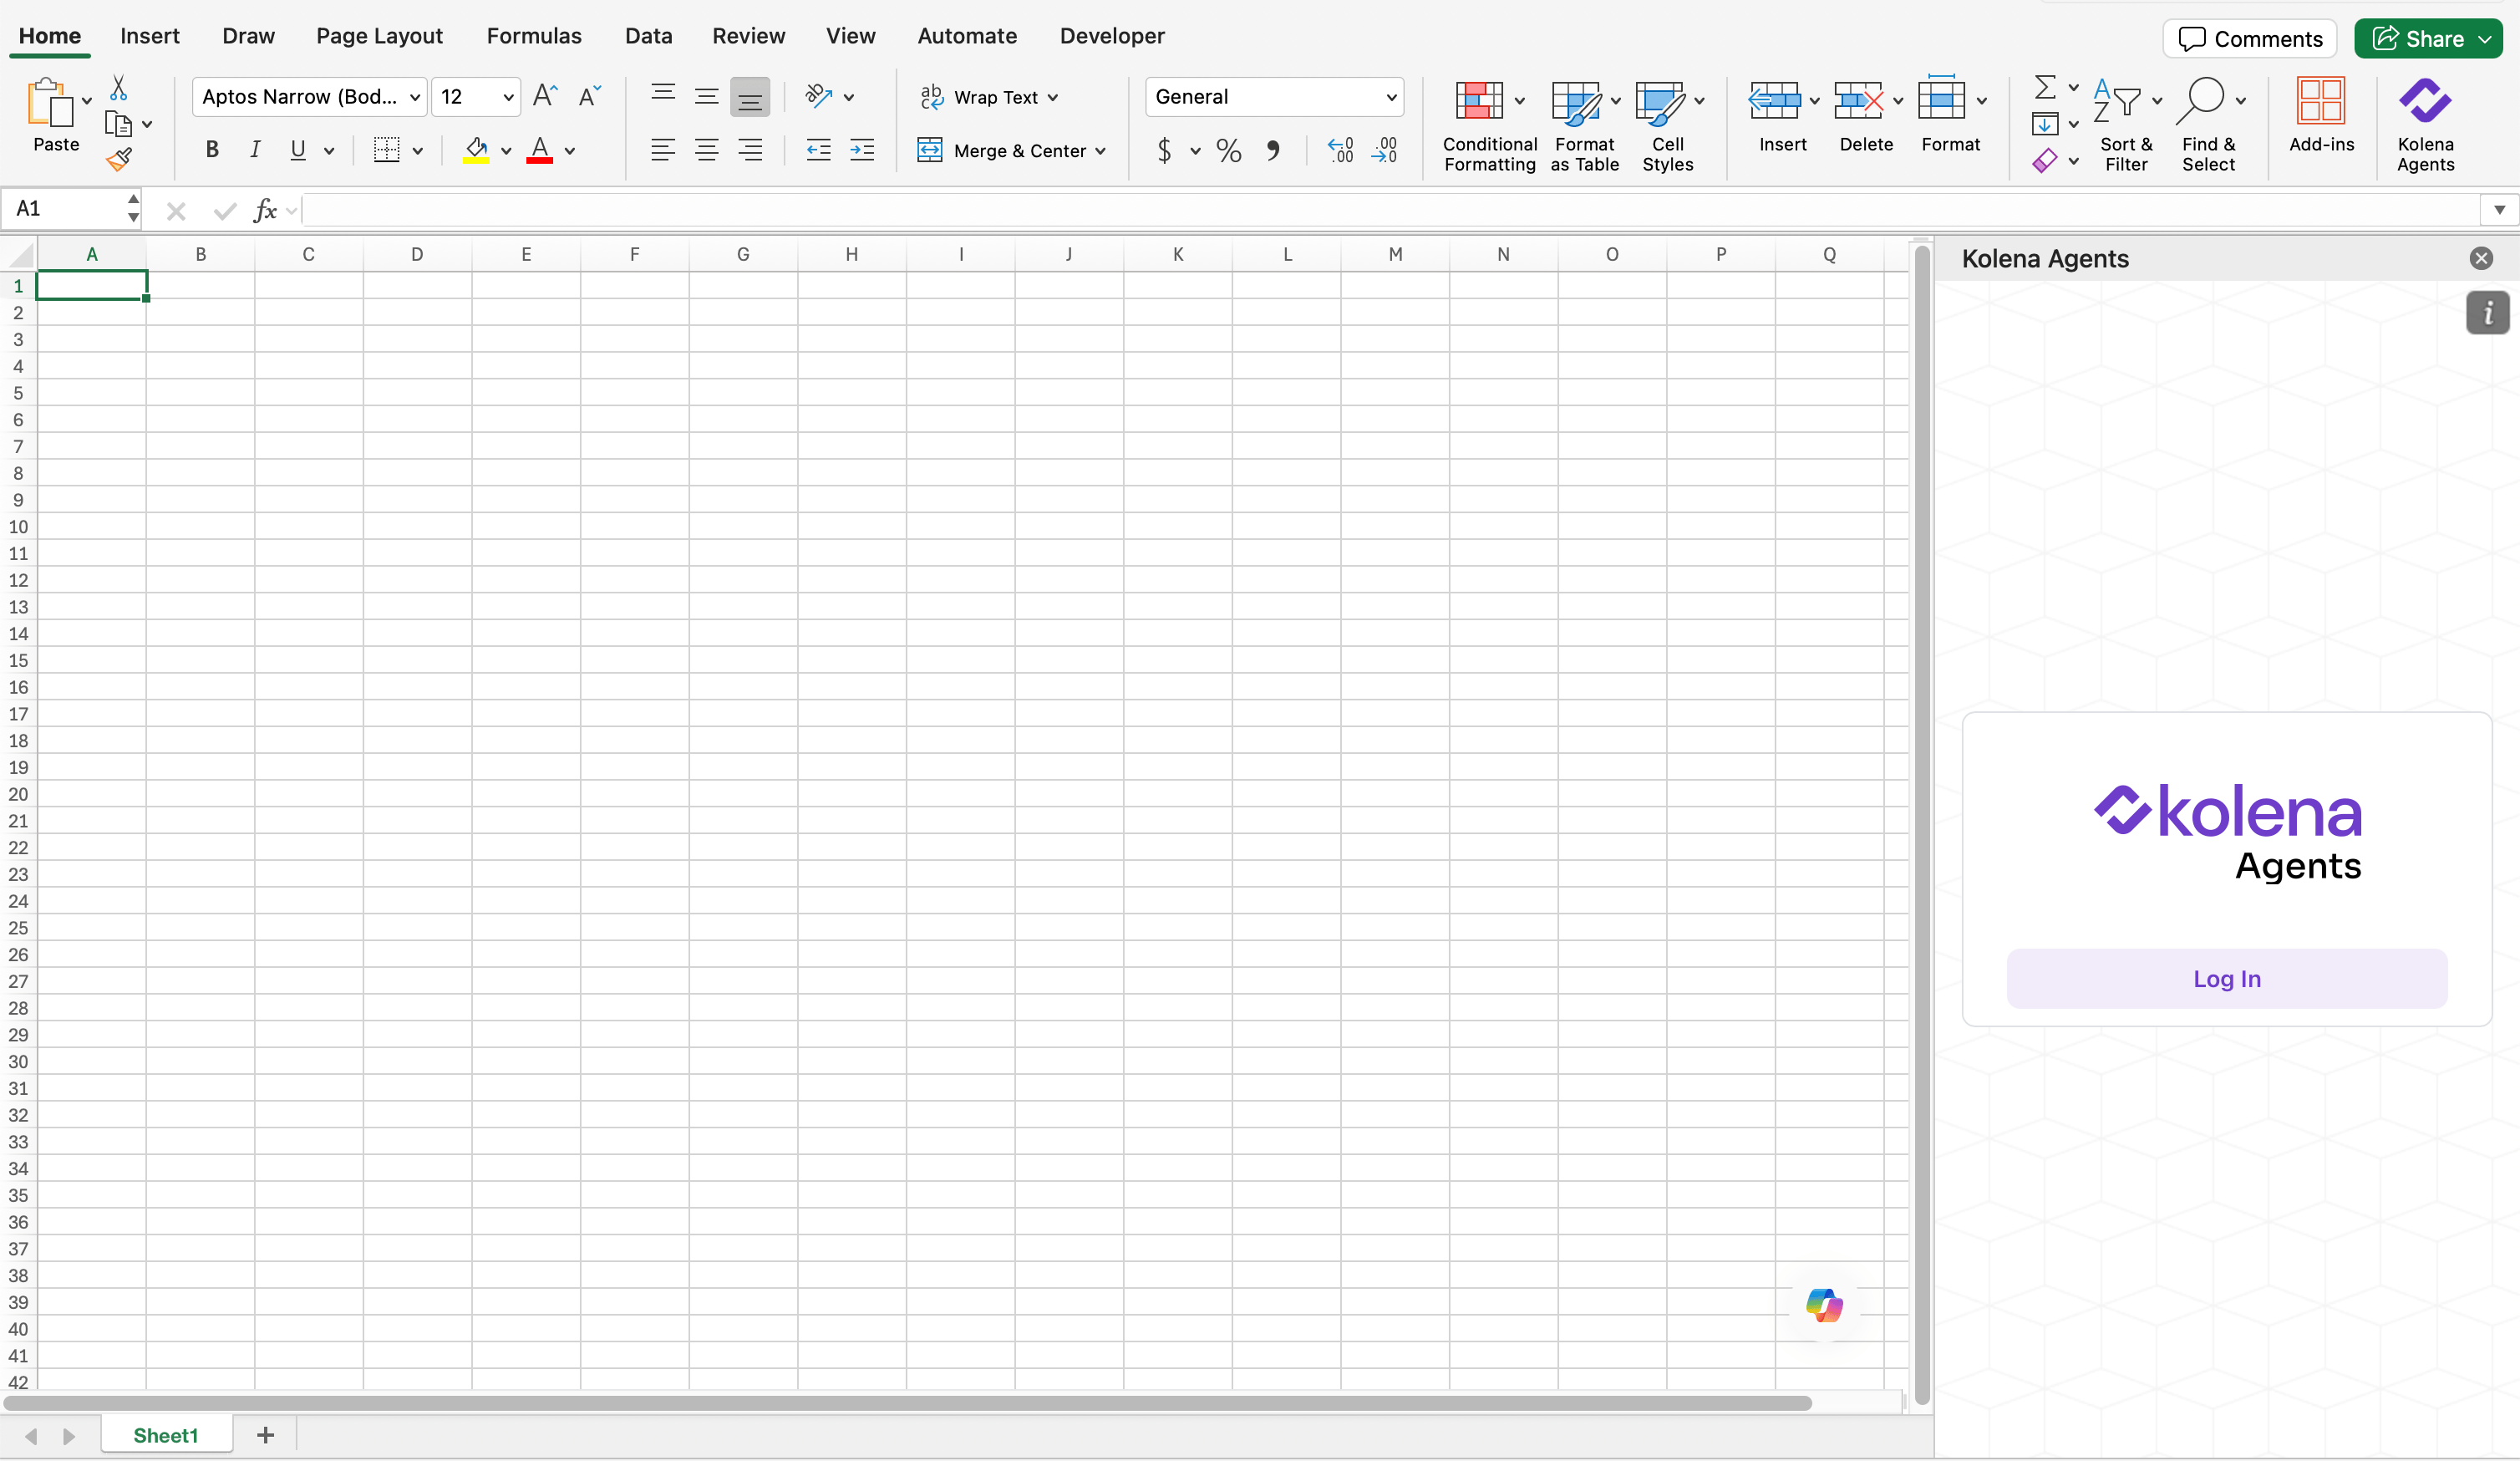 * Once installed, click the **Home** > **Kolena Agents** or **Home** > **Add-ins** > **Kolena Agents** to open the add-in pane
* When you open the add-in, you'll be presented with the login screen
* Click "Log In" to open the authentication dialog window. Follow the normal process to log in with your Kolena credentials
### Setting Up Your Template
#### Creating a New Template
To create a new template, we first need to associate it with the correct Agent:
* To begin, open an existing workbook or create a blank one if you're starting from scratch
* Open the Kolena Agents add-in and log in
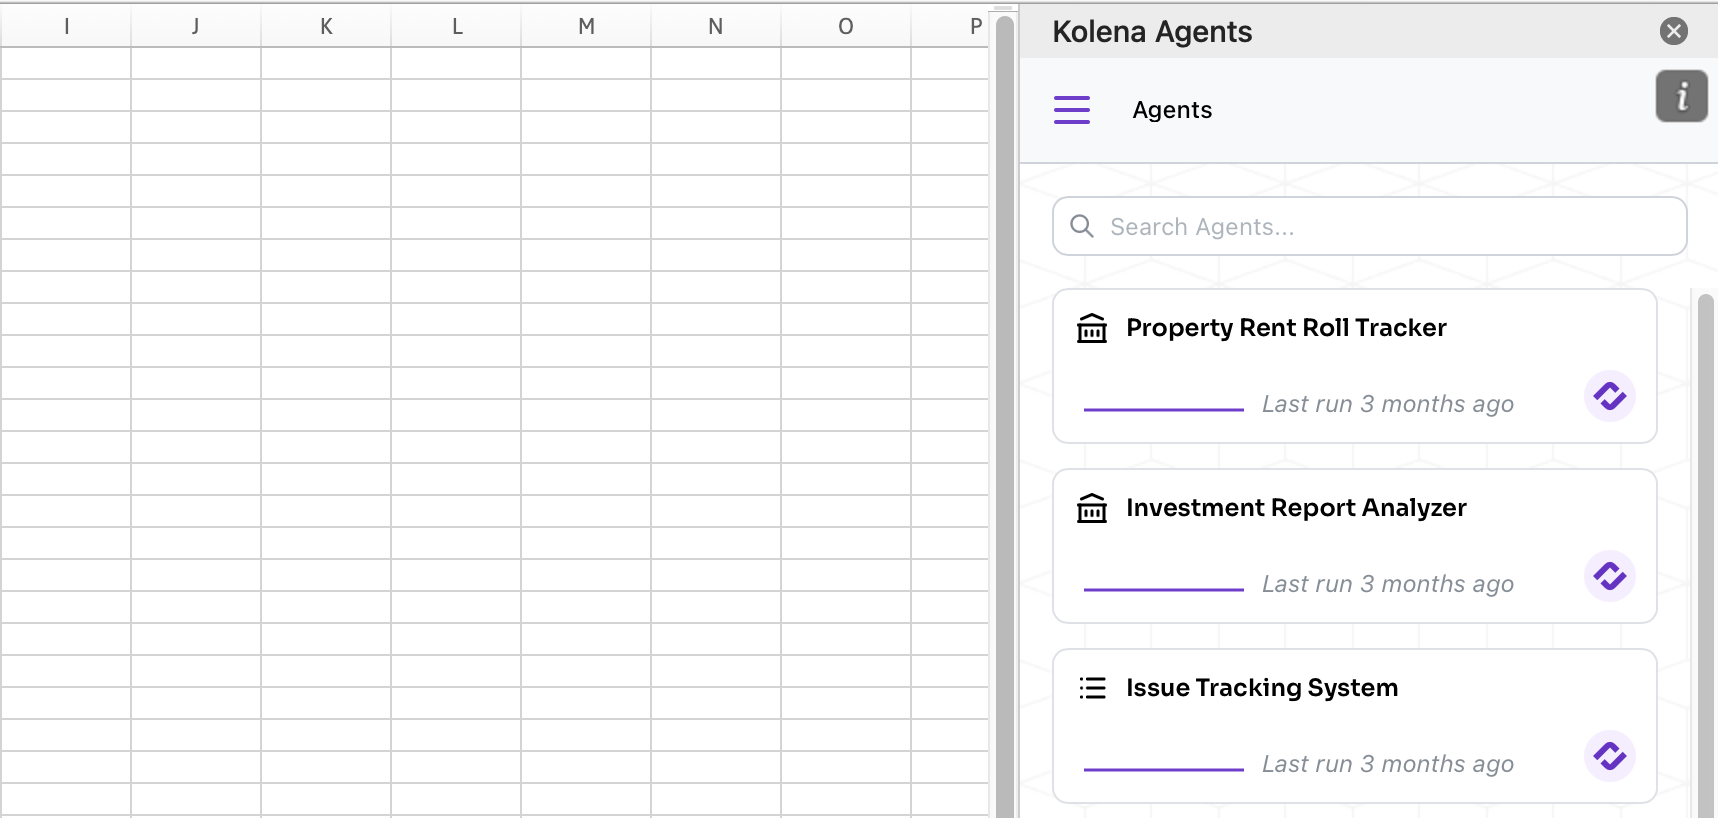
* You will see a list of the Agents available in your organization. Click the desired Agent. You can use the search bar to help you locate the correct Agent
* Once installed, click the **Home** > **Kolena Agents** or **Home** > **Add-ins** > **Kolena Agents** to open the add-in pane
* When you open the add-in, you'll be presented with the login screen
* Click "Log In" to open the authentication dialog window. Follow the normal process to log in with your Kolena credentials
### Setting Up Your Template
#### Creating a New Template
To create a new template, we first need to associate it with the correct Agent:
* To begin, open an existing workbook or create a blank one if you're starting from scratch
* Open the Kolena Agents add-in and log in
* You will see a list of the Agents available in your organization. Click the desired Agent. You can use the search bar to help you locate the correct Agent
 * If your Agent does not have any existing templates saved, you will be prompted to enter a name for your new template. Enter a filename and click **Create**
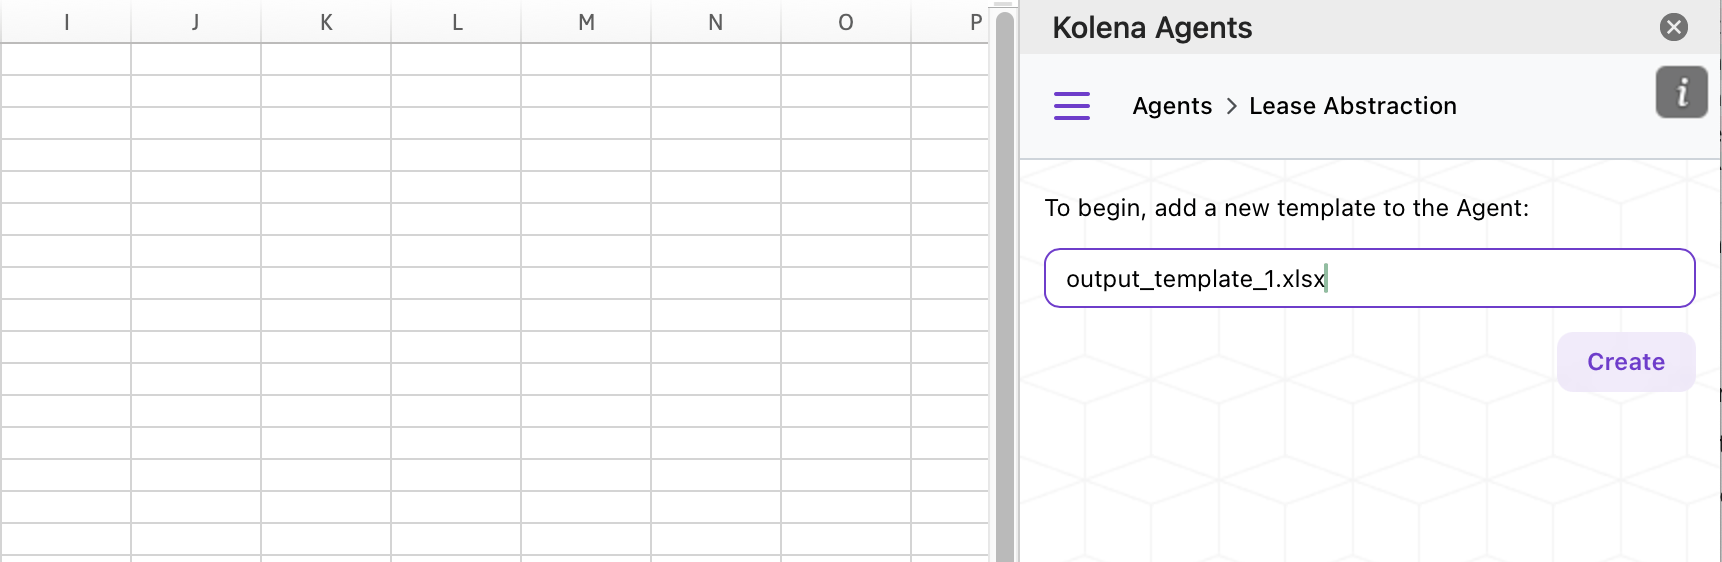 You can use [filename
placeholders](/templated-outputs#templating-the-output-file-name) when
choosing a filename in order to template the output filename.
* If your Agent already has templates saved, you will be prompted to selected a template. Click **Add New** at the bottom of the list, then enter a filename and click **Create**
You can use [filename
placeholders](/templated-outputs#templating-the-output-file-name) when
choosing a filename in order to template the output filename.
* If your Agent already has templates saved, you will be prompted to selected a template. Click **Add New** at the bottom of the list, then enter a filename and click **Create**
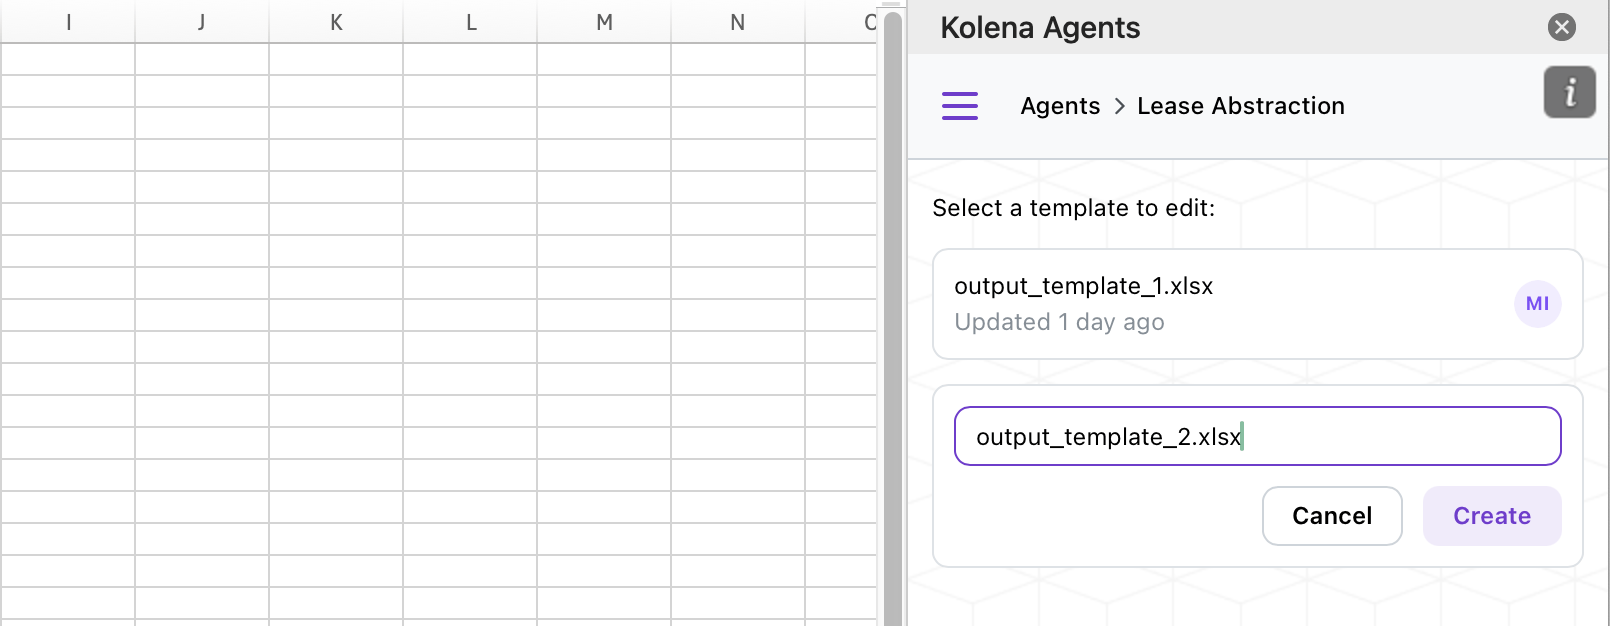 * The current workbook will be saved as a template to your Agent. You can now begin [editing](#editing-your-template).
#### Working with an Existing Agent Template
If your Agent already has a template saved, the first step is to open the template's Excel workbook. If you don't already have this workbook available, you can retrieve it from Kolena in two ways:
##### 1. Download from the Kolena Agents Excel Add-in
* Open the add-in from any Excel workbook
* If the add-in opens to the template editor interface (because your Workbook is already associated with an Agent template), use the breadcrumbs at the top of the app to navigate back to the "Agents" screen
* Select the Agent whose template you want to load
* On the template selection screen, select the template you want to load
* When prompted to load the template from the server, select "Load template contents from server"
* The current workbook will be saved as a template to your Agent. You can now begin [editing](#editing-your-template).
#### Working with an Existing Agent Template
If your Agent already has a template saved, the first step is to open the template's Excel workbook. If you don't already have this workbook available, you can retrieve it from Kolena in two ways:
##### 1. Download from the Kolena Agents Excel Add-in
* Open the add-in from any Excel workbook
* If the add-in opens to the template editor interface (because your Workbook is already associated with an Agent template), use the breadcrumbs at the top of the app to navigate back to the "Agents" screen
* Select the Agent whose template you want to load
* On the template selection screen, select the template you want to load
* When prompted to load the template from the server, select "Load template contents from server"
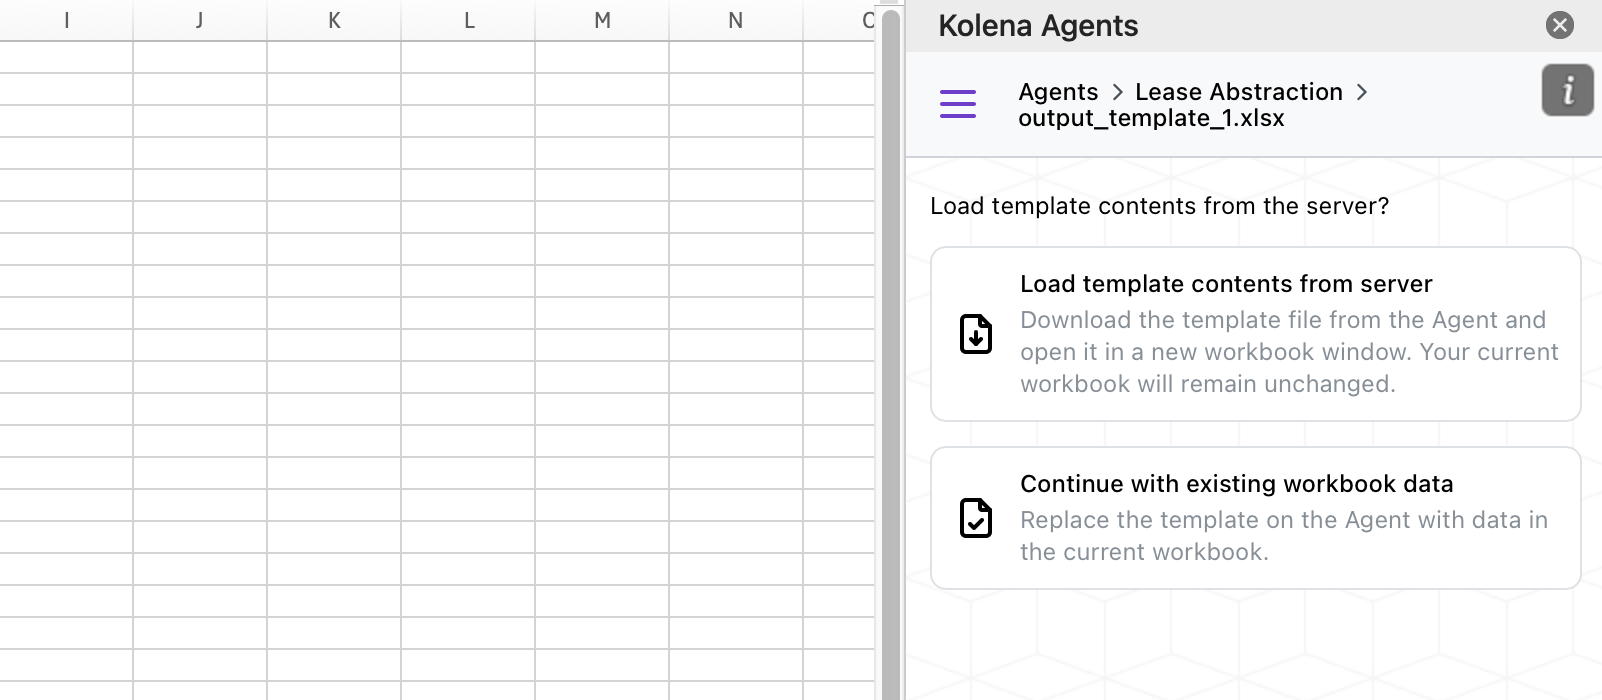 * The template will open in a new Excel window. Open the add-in in the new window to begin editing
You may need to select the appropriate template again in the new window if
this template has never been edited in the add-in before. If the add-in opens
to the Agents list in the new window, follow the steps above but when prompted
to load the template from the server, select "Continue with existing workbook
data"
##### 2. Download from the Kolena Agents Web Application
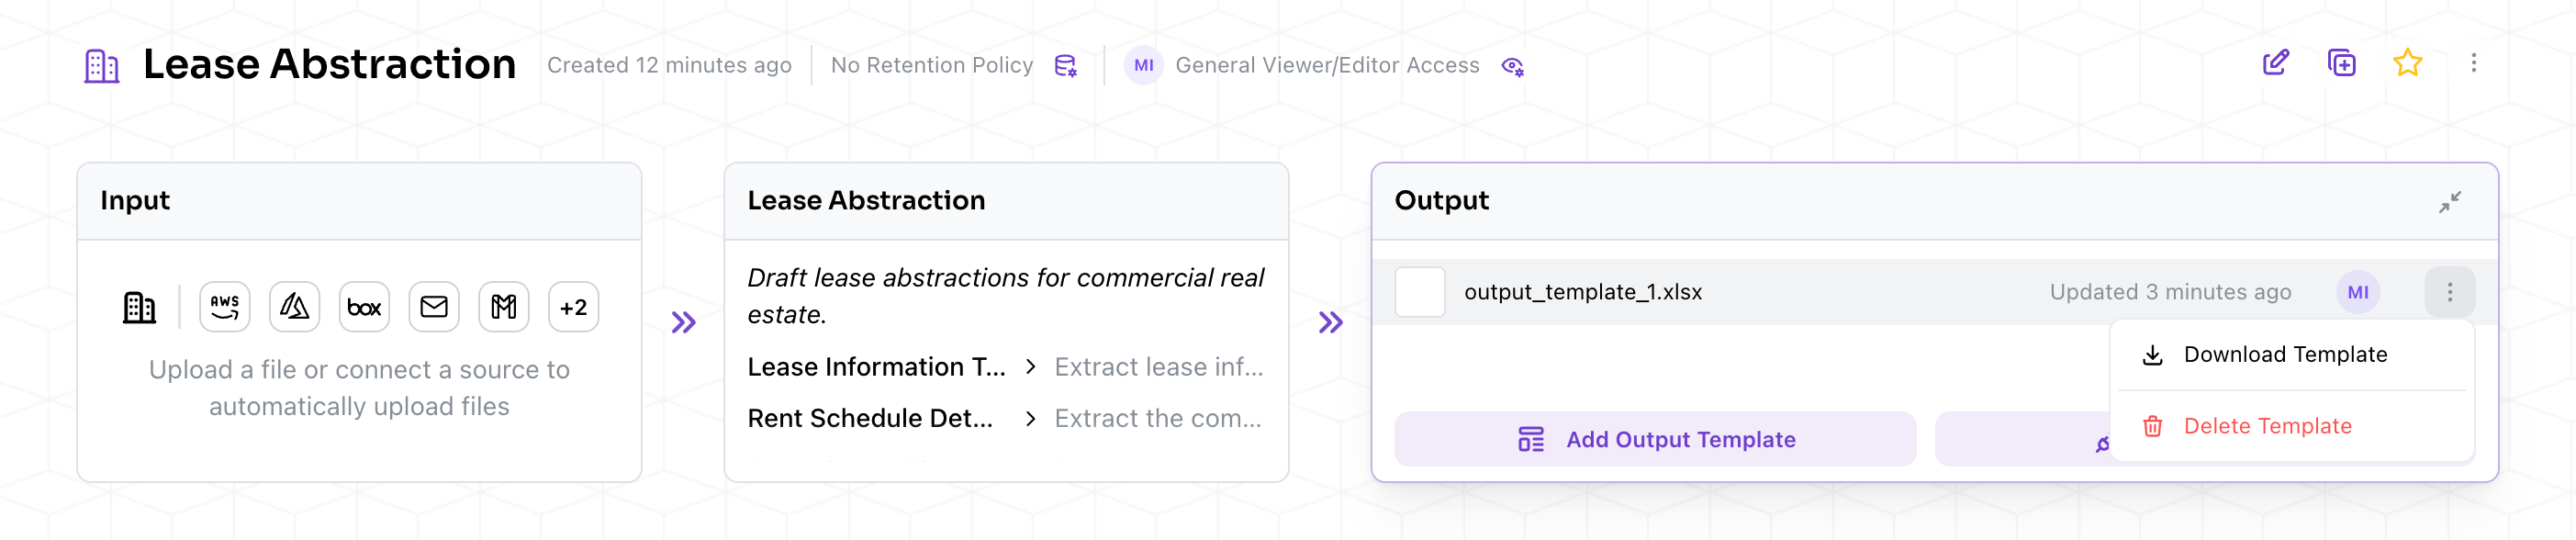
* From your Agent's main page, click the "Output" box
* Click the menu dots next to the template you would like to download, and select **Download Template**
* The template will open in a new Excel window. Open the add-in in the new window to begin editing
You may need to select the appropriate template again in the new window if
this template has never been edited in the add-in before. If the add-in opens
to the Agents list in the new window, follow the steps above but when prompted
to load the template from the server, select "Continue with existing workbook
data"
##### 2. Download from the Kolena Agents Web Application
* From your Agent's main page, click the "Output" box
* Click the menu dots next to the template you would like to download, and select **Download Template**
 ### Editing Your Template
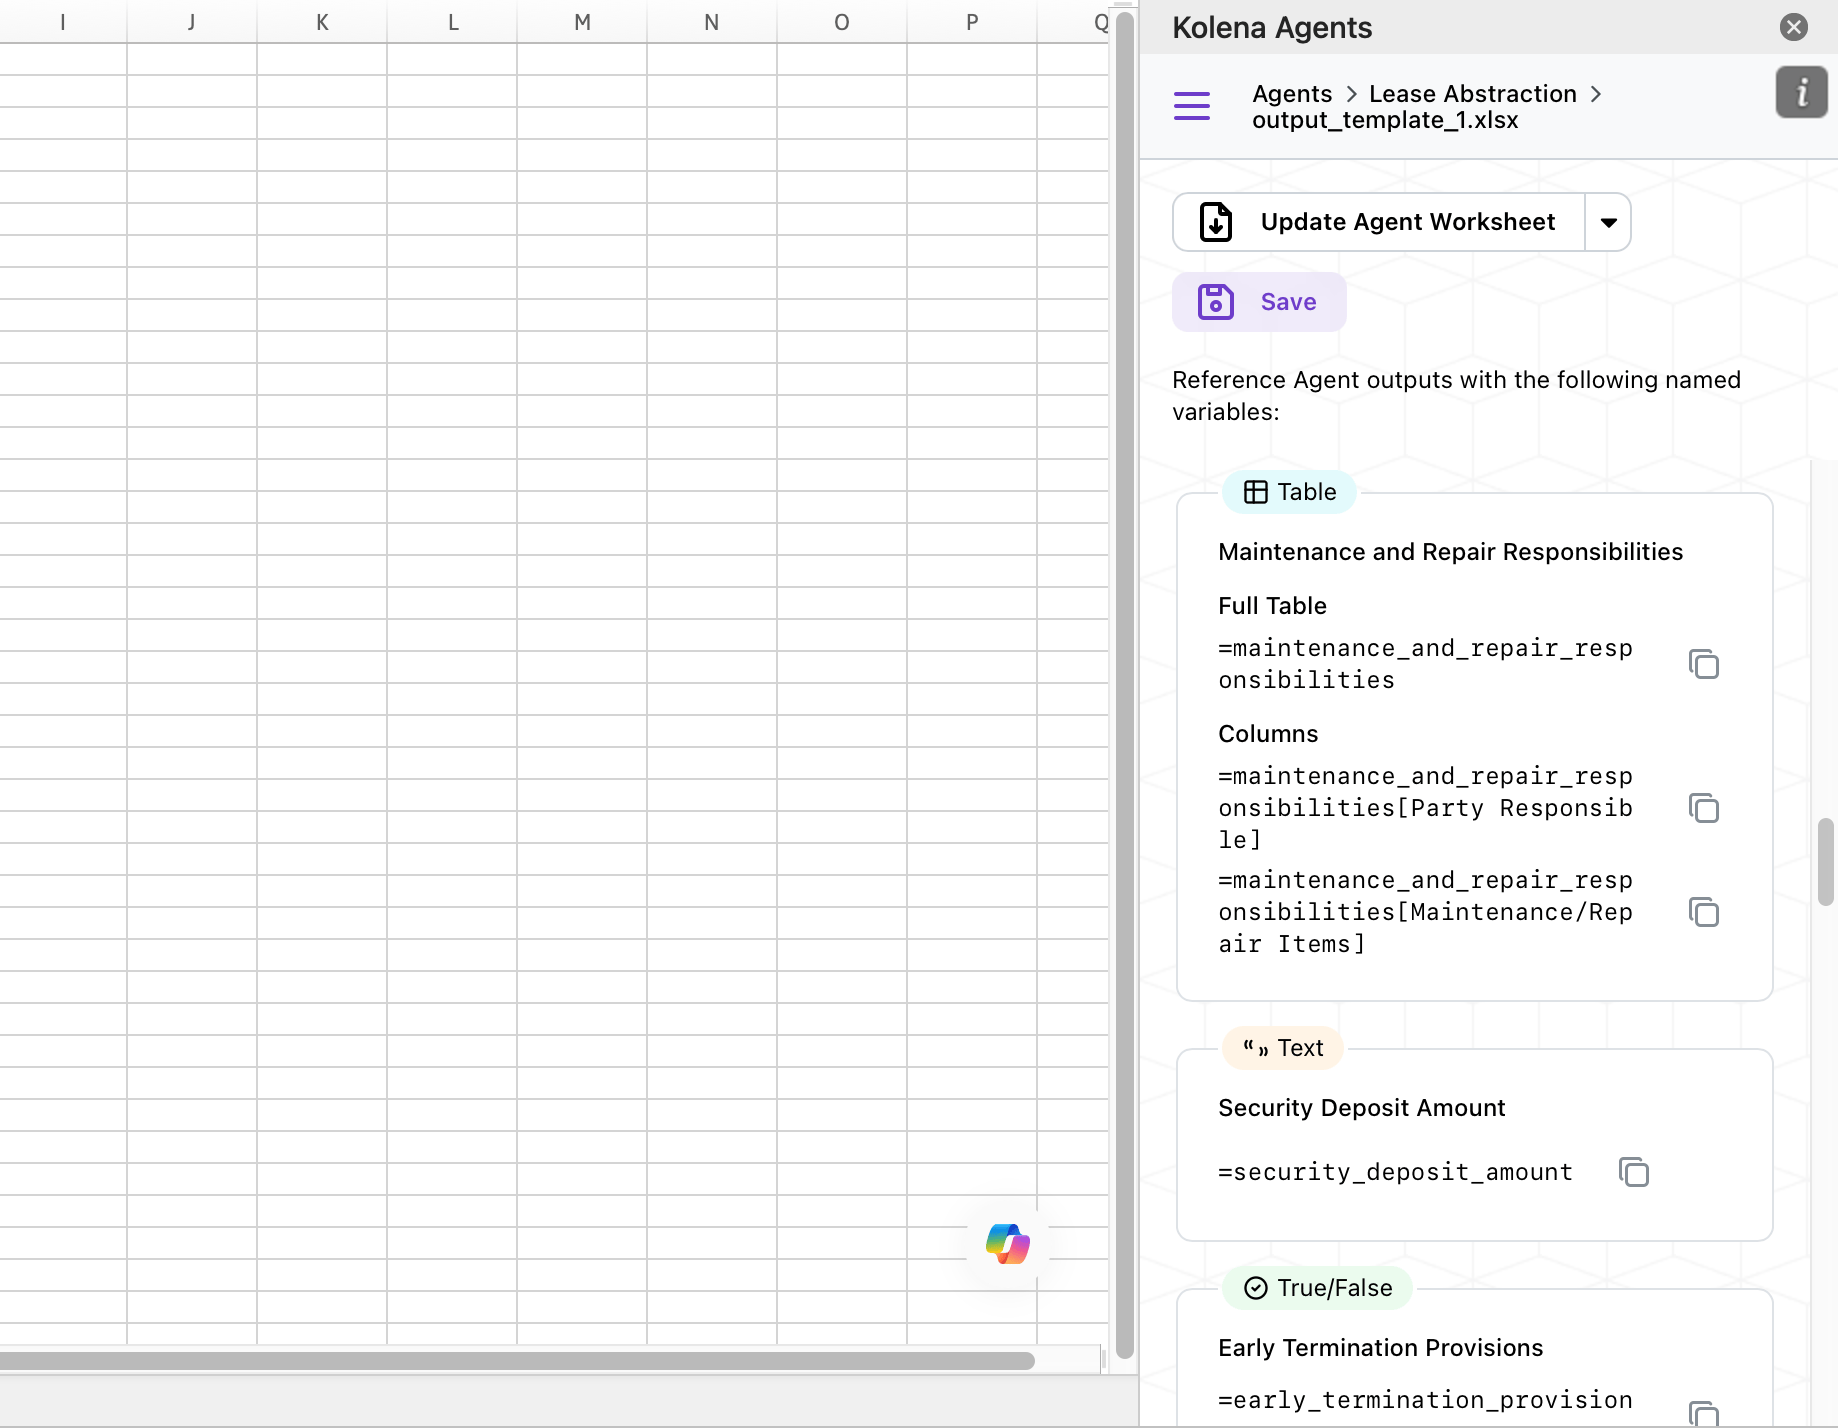 The template editor provides:
* **Breadcrumb navigation** showing your current Agent and template
* **Update Agent Worksheet button** to preview how templated output will look with different Agent runs
* **Save button** to save your changes back to the Agent
* **Placeholder list** showing all available Agent outputs you can reference
### Previewing Templates
#### Updating the Agent Worksheet
You can preview how templated output will look with different Agent runs:
1. Click **Update Agent Worksheet** in the template editor
2. The "Kolena Agent" worksheet will be updated with data from the selected run
3. Your template formulas will automatically recalculate with the new data
#### Selecting Different Runs
To preview with a different Agent run:
1. Click the dropdown arrow next to the **Update Agent Worksheet** button
2. Use the up and down arrow buttons to navigate between runs
3. Click **Update Agent Worksheet** to update the template with the selected run's data
The template editor provides:
* **Breadcrumb navigation** showing your current Agent and template
* **Update Agent Worksheet button** to preview how templated output will look with different Agent runs
* **Save button** to save your changes back to the Agent
* **Placeholder list** showing all available Agent outputs you can reference
### Previewing Templates
#### Updating the Agent Worksheet
You can preview how templated output will look with different Agent runs:
1. Click **Update Agent Worksheet** in the template editor
2. The "Kolena Agent" worksheet will be updated with data from the selected run
3. Your template formulas will automatically recalculate with the new data
#### Selecting Different Runs
To preview with a different Agent run:
1. Click the dropdown arrow next to the **Update Agent Worksheet** button
2. Use the up and down arrow buttons to navigate between runs
3. Click **Update Agent Worksheet** to update the template with the selected run's data
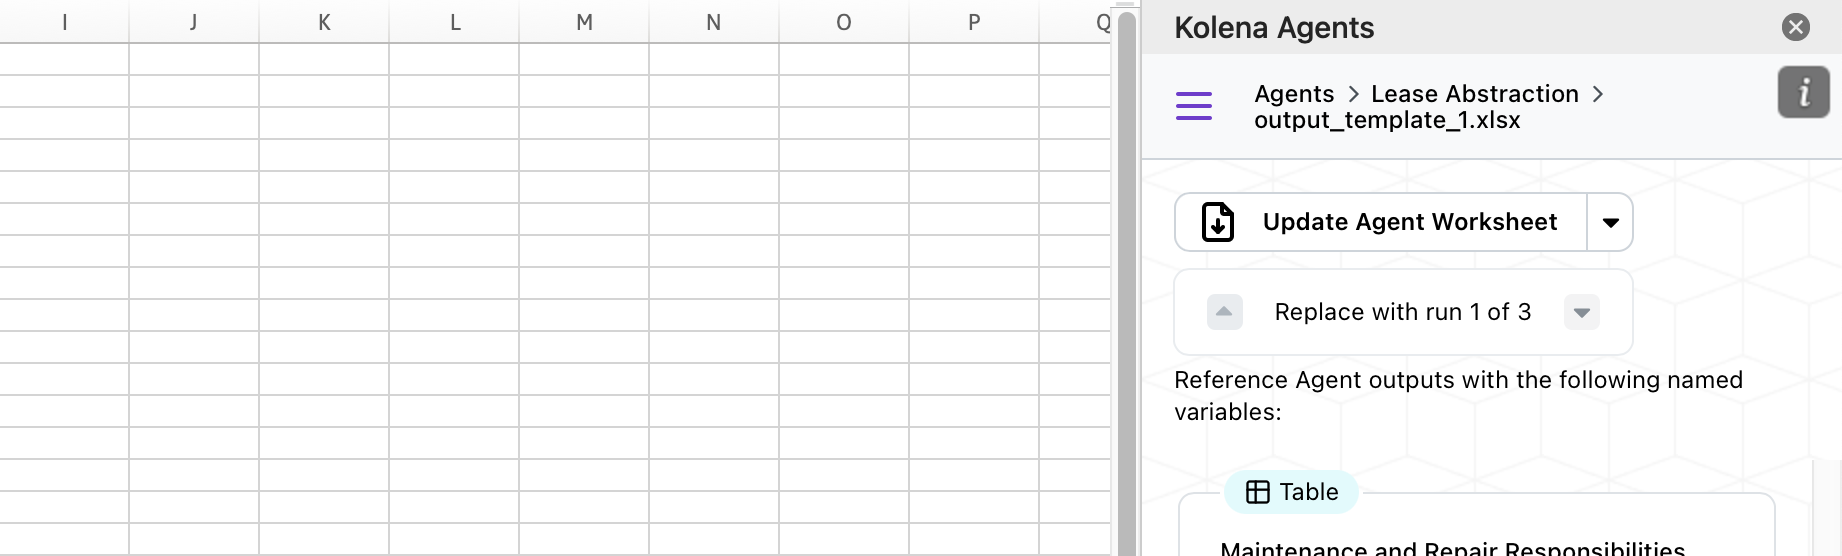 This allows you to:
* Test your template with different data sets
* Verify formulas work correctly across various scenarios
* Ensure formatting looks good with different data volumes
### Saving Templates
#### Saving Your Changes
When you're ready to save your template:
1. Click the **Save** button in the template editor
2. The current workbook will be uploaded and replace the template on the Agent
3. A checkmark will appear briefly to confirm the save was successful
Once saved, the template will be available for:
* Direct downloads from Agent runs
* Automated export to configured Destinations
### Best Practices
* **Save frequently** while editing to avoid losing work
* **Preview with multiple runs** before saving to ensure your template works with different data
* **Test formulas** with edge cases (empty data, long text, etc.)
This allows you to:
* Test your template with different data sets
* Verify formulas work correctly across various scenarios
* Ensure formatting looks good with different data volumes
### Saving Templates
#### Saving Your Changes
When you're ready to save your template:
1. Click the **Save** button in the template editor
2. The current workbook will be uploaded and replace the template on the Agent
3. A checkmark will appear briefly to confirm the save was successful
Once saved, the template will be available for:
* Direct downloads from Agent runs
* Automated export to configured Destinations
### Best Practices
* **Save frequently** while editing to avoid losing work
* **Preview with multiple runs** before saving to ensure your template works with different data
* **Test formulas** with edge cases (empty data, long text, etc.)